Showing posts with label smartphone. Show all posts

Wednesday, January 15, 2014

Bushwalking Equipment | Can I Really Do Without a Smartphone?

As a bushwalker, can you afford not to own a smartphone? Which smartphone apps can replace dedicated equipment? What are the limitations?

Over the last few years technology has made smartphones invaluable to bushwalkers, replacing many of the devices, which previously had to be bought and carried individually.

Probably the first device carried by bushwalkers to be incorporated into the iPhone was the still and movie camera. Today's smartphone has a high quality camera which can take video and stills, including panoramas, mark each with the location at which the photo was taken, and then upload it to the web using wifi or mobile (cellular) data.

Next, the GPS became available, allowing routes to be mapped live, waypoints determined and marked, and distances accurately determined. Recently, apps which allow the viewing of calibrated digital maps have become commonly available, and some apps now incorporate the navigation features found in a dedicated GPS. High resolution colour screens make viewing these maps and navigational features easy. Modern smartphones have built-in compasses which can be calibrated and are accurate enough for the day walker, but not accurate enough for bearings over long distances.

Then high quality heart rate sensors came on the market which could pair with a smartphone, initially using a "dongle" plugged into the earphone socket but more recently using low energy interference-free Bluetooth.
 Some apps even use the smartphone camera and built-in light to measure blood flow pulses in a finger, without the need for an independent sensor. Fitness training had become more scientific!

The next advance was the ability to measure heart rate variability (HRV) (see previous post), using the powerful analysis capabilities of modern smartphones. Initially measuring HRV was only possible with expensive laboratory based equipment, but soon Polar had incorporated this ability into some of their top-of-the-line wrist computers. In the last few years, this technology has migrated to the smart phone, allowing bushwalk training to be fine tuned.

Bush walkers visiting remote areas often feel the need to take emergency devices with them to obtain help if an emergency occurs. We are all familiar with personal location beacons (PLBs) which can transmit a message, including location, to an overhead satellite, and from there to emergency rescue services.


SPOT gen3 s can send a message via satellite to your emergency contacts or to the same rescue service. Version three is much better functionally according to the reviews, but has a more expensive subscription.

Recently smartphone apps (GetHomeSafe) have become available which can send an SMS or email, if a bushwalker fails to return on time, without the need for any action by the "injured" or "lost" person or instantly in a critical emergency to a contact list or even rescue services directly, including the current location, participant details and a route plan. "You don’t need a working phone (be within range) or even to be be conscious for an alert to be sent."

Bush walkers on day walks and within range of a mobile tower, up to 70 km from a high enough vantage point, can add weather and tide apps  and the ability to visualise routes or places in 3D using Google Earth.

We now have GPS, fitness, navigation, mapping, emergency notification and weather services available at low cost in the one device! The only problem is a lack of battery capacity, but even this can be overcome to some extent with a solar charger.
What is next?
How do you overcome these limitations?
Where will the future take us?

  Creative Commons License This article by Bush Walker is licensed under a Creative Commons Attribution-NonCommercial-ShareAlike 3.0 Unported License.

Tuesday, January 14, 2014

Bushwalking Fitness | Pt 3 My Choice of Smartphone Apps for Fitness Training

Which apps should I choose to monitor my fitness? How should they be integrated? How should I fine tune my training, using the data collected?

As mentioned in the previous two posts, Part 1 and Part 2, technology incorporated into the smartphone and low cost, high quality apps now enable bushwalkers to monitor their fitness and training program in a way previously only achievable by elite athletes working in an  exercise laboratory. Both of these posts should be read as they provide necessary background for this post.

To maintain a high level of fitness, the bushwalker needs to be able to
Many of these can also be monitored by advanced wrist computers incorporating GPS and heart rate monitors, but these usually lack the versatility of a smartphone.

Measuring Personal Fitness

Polar Beat has an in-app purchase which allows your to do a Fitness Test (see previous post for more details) which you can then match with VO2max norms for your age and gender. This should give  similar results to the values produced by Polar OwnIndex® found in many of the high-end Polar wrist computers, but I have found them to be about 5 points lower.

iThlete, BioForce HRM, and HRV4training use HRV as an indicator of fitness, with higher values indicating higher fitness levels. I am currently trialling both iThlete and HRV4training and may continue with both, as they offer slightly different but important features.

iThlete enables you to log important "environmental" factors such as sleep, fatigue, training load, muscle soreness, stress, mood and diet and check for correlations with HRV scores. HRV4training automates the HRV measuring process, giving the option of lying down or standing or both. If this option is chosen, the difference between standing and lying down is automatically calculated and can give valuable information about fitness, as the difference increases with fitness.

Logging Training Sessions

Precision Pulse HRM monitors, HRaverage and HRmaximum, kCal burnt, and training load, as measured by an objective TRIMP score, determined by time in each training zone and heart rate. Without this knowledge, training loads become rather subjective, especially if there is variation in the type of activity, volume and intensity, and therefore affect the reliability of the HRV data.

I have been using Walkmeter ( Apple) for about 5 years and find it to be an excellent app for maintaining a log of your training sessions, including GPS location, Activity, Route, kCals, Heart Rate, Elevation climbed and Duration, which can then be graphed and mapped or viewed live. Most importantly it is very user friendly, making excellent use of the remote controller on the earplug to control start/stop, playing of motivational music and user defined voice announcements such as pace, time, progress in relation to worst, medium, best previous times for the route. This means you don't have to take your iPhone out of your pocket to control the app. It has the ability to automatically stop if you are stationary for more than a user defined duration, which is very handy. All of this information can be shared live using social media, if you are so inclined.

Polar Beat offers some of the above features  such as measurement of distance, calories, speed, heart rate, and provides voice announcements and map location,  but appears to be not yet fully developed. It does however integrate well with the Polar website.

Planning Future Training Sessions

Both iThlete and HRV4training provide bushwalker friendly advice about the day's training session by relating  the morning's heart rate and HRV measurements to previous days.

Careful analysis of data provided by Walkmeter, such as average and maximum heart rates, time in each training zone, and duration in relation to previous times, can provide a limited guide, but lacks the predictive ability of the first two apps..

Social Media and Web Integration

Many fitness apps allow social media integration with Facebook and Twitter, and may allow upload to a proprietary website, for more detailed analysis.

Related posts

Bushwalking Fitness | Pt 1 Smart Phone Apps to Fine Tune your Bushwalk Training
Bushwalking Fitness | Pt 2. Using a Heart Rate Monitor and a Smartphone to Measure Fitness Variables


  Creative Commons License This article by Bush Walker is licensed under a Creative Commons Attribution-NonCommercial-ShareAlike 3.0 Unported License.

Friday, January 4, 2013

Bushwalking Fitness | Is stretching a waste of time?

Is static stretching a waste of time? Does static stretching before exercise prevent muscle soreness and injury? Can static stretching beforehand reduce power during a bushwalk?
With a couple of  almost 3000m Canadian mountains (Mt.Begbie near Revelstoke and Mt Tupper near Roger's Pass) to climb in September, and with the festive season having played havoc with my fitness, I have again made my annual New Year's resolution to improve my fitness.

Mt Begbie, Revelstoke (© goldenscrambles.ca)
Mt Tupper, Rogers Pass (© Selkirk Mountain Experience)

My usual weekly keep-fit regime involves 3 or 4,  45 - 60 minute walks on rugged and hilly tracks near my home, interspersed with a Pilates class or two, and as I approach a major bushwalk/climb, 1 or 2 bushwalk-specific weight resistance sessions at my local gym. In hot weather, I cool down after  my morning walk with a 1 km swim.

While annual gym fees are substantial, cutting back on my wine consumption by a glass a day, more than pays for the cost! This training schedule may seem excessive to some, but I've found that to enjoy a bush walk, and in some cases a 10-12 hour day with a heavy pack, that a high level of fitness is needed. As I get older, it takes more effort to reach and maintain the same level of fitness.

Training Route, Brownhill (3.83 km)
I find that, as I usually train on my own, I need some incentive to improve and for this I  use the highly regarded iPhone app Walkmeter which enables me to compare my times from walk to walk and from stage to stage within the walk. It even allows me to select background music with appropriate BPM (beats per minute) and gives me feedback throughout the walk as to how I rate compared with my best, median and worst times at key points ( see map above) along this route. All of these statistics, including calories burnt, can be viewed online , exported to Google Earth (kml or gpx files) or shared with your training partner.

As I have been noticing a little calf muscle soreness during these walks, I thought I would investigate if a stretching regime could help. To my surprise, I found that the benefits of stretching were rather controversial.
Researchers Robert Herbert, Ph.D., and Marcos de Noronha, Ph.D. of the University of Sydney conducted a systematic review and meta-analysis of 10 previously published studies of stretching either before or after athletic activity. They concluded that stretching before exercise doesn't prevent post-exercise muscle soreness. They also found little support for the theory that stretching immediately before exercise can prevent either overuse or acute sports injuries.  (When to Stretch - Experts Recommend Static Stretching After Exercise ©2013 About.com. All rights reserved.)
Part 2 of this post outlines a bushwalk training session which has been designed for me by a professional trainer and includes a warm up with dynamic stretches, training walk, and a cool down including static stretches.

Other Bushwalk Fitness related posts (9)

Bushwalking Fitness
Bushwalking Fitness | Stretches for Bushwalkers
Bushwalking Fitness | Planning a Bushwalk Training Session

  Creative Commons License This article by Bush Walker is licensed under a Creative Commons Attribution-NonCommercial-ShareAlike 3.0 Unported License.

Tuesday, September 11, 2012

Bushwalking Skills | Making a Bushwalking Aide-memoire

Do you lead bushwalks? Thought about carrying an aide-memoire  for emergencies? What resources will you need?
In the nineties, when I was actively upgrading my bushwalk leadership qualifications, I kept an aide-memoire to help me remember the key points of bushwalking for in-the-field examinations. This was initially kept in several "Granny's brag books",  4" x 6" photo albums with the cardboard stiffeners removed and with the individual plastic pockets sealed, then progressed to a Sharp Organiser, then to a Palm PDA and finally to my Nokia Smartphone, before being archived to a wiki (see link above). To keep the number of "album" pages to a minimum, the text was reduced to 7 pt.

The first aid was collated from Senior First Aid courses which I did with St John's and the Red Cross, with additional information added from wilderness first aid courses and books I had read.

 Disclaimer: Although I culled information, which I knew was out-of-date, when I first set up this wiki, I have not updated the first aid information for the last few years, and as some things change every few years eg snake bite and EAR, the aide-memoire needs to be checked with an up-to-date first aid manual.

For many years, I carried this information, in note form, as a resource for emergencies, especially when leading bushwalks to remote areas of Australia. You might find such a concept useful, and perhaps be able to use the topic outline as  a worthwhile starting point.

If I was making one today, I would add it as a pdf to my Smartphone, which I usually carry with me. You could of course use your camera-equipped smartphone to copy relevant pages from books and save as a photo album. If you carry a Kindle with you, for your light reading, you have another alternative. However, in a pinch, I think "Granny's brag book" would prove to be the most reliable of them all!

Recently I have added some excellent  leadership articles by Rick Curtis (Director, Outdoor Action Program), which no longer seem to be online at his website. This material is the Group Development and Leadership Chapter from his Outdoor Action Program Leader's Manual. You can find some of the more useful articles in the sidebar to the right, under Bushwalking Resources, and the rest in my wiki. The text may be freely distributed for nonprofit educational use. However, if included in publications, written or electronic, attributions must be made to the author. Commercial use of this material is prohibited without express written permission from the author. Copyright © 1995 Rick Curtis, Outdoor Action Program, Princeton University.

Discussion: 
I'd love to know if you carry an "aide-memoire", what type and what it contains.

Other related leadership articles
See Categories or Labels in the sidebar on the right.
 

  Creative Commons License This article by Bush Walker is licensed under a Creative Commons Attribution-NonCommercial-ShareAlike 3.0 Unported License.

Friday, December 30, 2011

Bushwalking Equipment | Keep Your Camera Working in the Cold and Wet

Ever tried to take photos in the rain on a cold day or come inside from the cold to a nice warm hut/car/tent and wondered why you couldn't see through the lens? Worried about what will happen when you go outside into the cold and wet?
These are universal problems for outdoors photographers and can be incredibly frustrating, as I recently experienced on the Routeburn Track in New Zealand.

Fortunately the cold itself is not usually a problem for a warm camera ( NB the same applies to your smart phone's inbuilt camera), as condensation does not form on warm objects and cold air is usually relatively dry. There are of course the dual problems of the rain or snow falling on the lens or getting into the camera electronics and then there are the  batteries, which often fail when cold. No batteries, no photos!

Solving the battery problem is relatively easy. Just keep the camera warm, next to your body, along with a spare set of batteries which you can use to replace the non-functioning cold batteries if needed. Swap them back with the newly warmed batteries, if you need to repeat the process. While they are much more expensive, Lithium batteries last longer and perform better in the cold than NiCad.

The difficulty of shooting photos in the cold and wet is that you often get water on the lens or viewfinder, which either makes it difficult to compose the shot or ruins it completely. Pull your rain jacket hood over your head and use a  peaked cap to keep the water off the lens and camera. Keep the camera inside your jacket near your body, where it's easy to find, not inside your cold backpack, where both the camera and the pack contents will get wet every time you want to take a photo.

The alternative of course, is not to take the camera out of you pack during rain, but then why bring your camera at all, if you're not going to use it. Wet weather photos are unique and mountain scenery with rain and snow falling, cascading waterfalls, racing creeks and swirling fog is magical.

If it's particularly cold and you are wearing gloves, then you have another problem. Take your gloves off and freeze while you operate the buttons or use a camera that is fully automatic. Even better, buy a waterproof fully automatic camera or a single use waterproof camera.

Coming inside after a long day in the cold is the most problematic. The greater the temperature difference between your camera and the warm moist air produced by all those wet clothes drying in front of the fire, the greater will be the condensation on your lens and electronics. The solution of course is to minimise the temperature difference by either pre-warming your camera or slowly letting it warm in the coldest place you can find inside.

Placing your camera in a waterproof bag before you come inside, will make sure that any condensation is on the outside of the bag not on your camera. Then its just a matter of waiting until your camera warms up before you take it out of its bag.

The same applies to your camera card and batteries, let them warm up next to your body before changing them in your camera.

Acknowlegement

Thanks to Bill S from Trailspace and the New York Institute of Photography for the inspiration to write this article. I needed reminding that condensation only occurs on cold surfaces.

Read more
Related posts
How to Use Your Camera in Cold Weather (RitzCamera.com)
Cold Weather Photography (Trailspace)


  Creative Commons License This article by Bush Walker is licensed under a Creative Commons Attribution-NonCommercial-ShareAlike 3.0 Unported License.

Thursday, December 29, 2011

iPhone App Review | Tide Prediction

Have you ever wanted to a walk safely along a beach, across a tidal estuary or around a rocky headland? Well of course you could check the BOM website from home before you left, but what if you had forgotten and only had your iPhone with you?
Sometimes knowing when high tide is going to be can be critical to planning a safe bushwalk. There are many locations where part of the walk will be along a beach, around a headland or across a tidal estuary. Often the guide book will warn that if the tide is high you must take and alternative inland route or even camp and wait for the next low tide. Being caught on an exposed headland as the tide advances is not much fun.

In Australia, I have used this information to safely plan walks along the Great Ocean Walk in South West Victoria and along the South Coast Track in Tasmania.

The following list of iPhone apps includes one that is actually a weather app which includes tides as one of its features.

AU Tides Pro
AU Tides Pro Screenshot
Contains downloaded database for 2010-2012, which means you don't need to be connected to the internet
World Tides 2012
Contain downloaded database for 2012 only, which means you will need to buy a new version at the end of 2012. This app only allows access to tide predictions 6 days ahead. World Tides uses the Simply Harmonic Formula and harmonic constants provided by the UKHO to give 7 day tide predictions without the need for an internet connection. Features: Moon/Sun Rise/Set times, large slidable tide graph, recent locations, built in zoomable map, gps sensor, search, and details page. 
Pocket Weather AU
Pocket Weather screen shot
I have used this as my weather app for over a year and don't see the need for an additional tide app. It does need internet access which makes it useless in remote areas, unlike the other three which actually download the tide database. Weather is sourced directly from the Australian Bureau of Meteorology (BOM) - an Australian Source for Australian Weather! #1 Weather Application in Australia, Best Australian App winner, Staff Pick in iTunes Store many times -
Shralp Tide (FREE)
Shralp Tide Screenshot
No network connection is required, so you can check anytime, anywhere. ShralpTide displays the current tide along with the high and low tides for the current day and the next 4 days. Includes an INTERACTIVE FULLSCREEN TIDE GRAPH in landscape mode. Turn the device on its side then touch the screen to see the tide at any time in the 24 hour window. Shralp Tide does not include all of the tide stations in the world. It has good coverage of the US and Canadian coasts as well as Australia, New Zealand and Japan. Beyond that there is spotty coverage of international locations.
The benefit of an iPhone tide app is that the calculations are done automatically for you if you select one of the non-standard ports. Of course, your iPhone probably has a GPS, in which case the app will work out what is the appropriate location on which to predict your tides.

You can of course use the Bureau of Meteorology's tide predictions available on their website, which are based on a series of "standard ports" around Australia. In Tasmania, Hobart is one of the five standard and one secondary ports with calculated tide predictions available. Time differences for a limited number of other secondary ports are provided so you can work approximate tide times yourself by adding or subtracting the time difference.( see map below)
From BOM
I don't know the technical side but my iPhone app Shralp Tide gives the following for Wednesday 28 December for the first high tide.
  • Maatsuyker Island (south of the bottom of Tasmania) high tide at 1.31 am as 0.69m
  • Hobart: high tide at 12.34 am of 1.05m
  • Bramble Cove : HIgh 3.17 am 0.78m
Bathurst Harbour is not listed nor Port Davey; you must use Bramble Cove.

BOM Tasmania gives Hobart as the nearest standard port and lists tides at secondary "ports" as a time difference from Hobart

Hobart HIGH at 1:02 AM 1:07m
  • Maatsuyker Island +0:25 H:M
  • Bramble Cove, near Port Davey is -0:48 H:M
  • Hobart 0:0
Using these differences the iPhone app gives a pretty close estimate except for Bramble Cove which seems to be way out!

PS Don't forget to allow for daylight saving if not done automatically by the app.


  Creative Commons License This article by Bush Walker is licensed under a Creative Commons Attribution-NonCommercial-ShareAlike 3.0 Unported License.

Sunday, December 18, 2011

iPhone Apps for Bushwalkers Revisited

It's over a year since I began reviewing iPhone apps for bushwalkers. During this time I have tried hundreds and found that I only use a few regularly.
While there are hundreds of iPhone apps useful to bushwalkers and growing every day, what you personally find useful is determined by your past experience, the type of walking you do, your interests,  and your willingness to be dependent on high tech devices.

After trying most, I regulary use only a few of these. On bushwalks, my choice will vary as it is dependent upon on the duration of my walk, and hence how important it is to save battery power,  and upon how much non-walking time I will have available.

My iPhone Apps

Navigation: Bit Map, Declination, Maps, Google Earth, Compass
Field Guides: Good Reader, BooksApp, Kindle, Aus. Birds (Morecomb), Field Guide Fauna Museum Victoria, Bird in Hand, WhatBirdNZ, Wikipanion, MyEnviro, FrogLog
Bushcraft / Survival : KnotsGuide, SASSurvival, Knots, GoneTrekking
Camp Food: Jamie Oliver's Recipes, Poh's Kitchen, Nigella Quick (....LOL)
Fitness: Walkmeter, Beat Monitor, Cadence, iHandy Level
Weather: Pkt Weather, Rainspotting, Clouds, iBarometer, ShralpTide, Clouds,WeatherNZ
Travel: Frequent Flyer, Webjet, Plane Finder, Lonely Planet, Trip Advisor
Astronomy: Star walk, Star Guide
NZ: WeatherNZ, WhatBirdNZ, SnowReports
Photography: Flickr
Medical: Elastoplast, MediProfiles, St John NZ

Disclaimer: Navigation using your iPhone always needs to be backed up with a compass, map and a dedicated GPS. 

I have written reviews of many of these iPhone apps previously in this blog, several articles about how to use iPhone apps in general while bushwalking, and detailed articles which focus upon iPhone apps for navigation, fitness and NZ.

Read more.....

  Creative Commons License This article by Bush Walker is licensed under a Creative Commons Attribution-NonCommercial-ShareAlike 3.0 Unported License.

Friday, December 16, 2011

Bushwalking Fitness | Pt 4 Motivate Yourself to Train by Monitoring Fitness Levels

How do you motivate yourself to do daily exercise and maintain the fitness levels so necessary for multi-day bushwalks in mountainous terrain? How can you monitor your fitness and see the improvement?
 I have just come back from two weeks in NZ, one week of which included carrying a 25-30kg pack with all my mountaineering gear, in addition to my normal bushwalking gear and food up and down 2400m high mountains. I am glad I spent almost a year getting fit, because with early starts (4.30 am) and long days (11 hours) pushing knee deep through soft snow, not only was strength needed, but also endurance.

My strongest motivator was to monitor my weight and fitness levels on a daily basis and seek inspiration from the long term trends, using a combination of my smartphone training app (iPhone Walkmeter), body composition monitor (Tanita InnerScan), and Polar wristwatch fitness test. In addition, I joined my local gym, when they had a special discounted rate, and they monitored my attendance, sending me an email or phoning when I missed too many sessions. I was able to see progress during these sessions too.

My Walkmeter iPhone app has been used by me on almost every training walk I have done over the last year. It has enabled me to set up training routes and see the improvement in my times over the year. I love the way it speaks to  me during the session and tells me how I am going compared to my best, median and worst efforts on the route, or if I wished, other "competitors" at regular intervals along the walk. My competitive spirit soon had me trying to beat my best! When I repeated the route, it enabled me to compare lap times or perhaps just record times at intermediate stages eg my turn around point. If I wanted to share my progress on Google Maps with others I could have used email, Facebook or Twitter to update them every few minutes and receive feedback.

Walkmeter iPhone app main screen
The main screen can be customised. Mine currently shows
  • Route name
  • Activity: walk, cycle, run etc
  • Walk Time
  • Distance
  • Speed
  • Time remaining
  • From best
  • Remaining distance
At the bottom of the screen, there are buttons for
  • Stopwatch: the start up screen
  • Map: uses Google maps and your inbuilt GPS
  • Calendar: with icons showing whether it was your best, median or worst time. This shows summaries* on a weekly, monthly or yearly basis.
  • Routes: shows history of time and speed and a leaderboard
  • Graphs: speed and elevation
  • Zones: monitor heart rate, bike speed and cadence with sensors
  • Remote control: using your audio cord buttons
  • Competitors: import your competitors or training partners data
  • Twitter, Facebook and email updates
* Summaries show: Count, Total distance, Total walk time, Total ascent and descent, Total calories, Average walk time, Average walk distance, Average speed, Fastest speed, Average calories, etc

Tanita Innerscan Body Monitor
My Tanita Innerscan has enabled me to monitor my weight on a daily basis and at the same time using the electrodes built into the base plate to measure Weight, Body Fat %, Body Water %, Daily Caloric Intake, Metabolic Age, Bone Mass, Muscle Mass, Physique Rating, and Visceral Fat Rating.  I have found the Metabolic Age to be the most useful, as this measurement has  correlated well with my fitness level measured using my Polar wristwatch. You must measure at the same time each day to achieve comparable results.

During the year, my metabolic age went from 44 years to 35 years, my weight from 82 kg to 77 kg, and  my body fat % from 21.6  to 18.2. I found these results a pleasing confirmation that my training sessions were achieving what I had hoped.

My Polar wristwatch was used initially to monitor my heart rate to make sure that I was exerting myself enough to improve my fitness. It soon revealed that walking on the flat, even at my maximum speed, was not going to improve my fitness much, so I was soon climbing the hills nearby. Without realising the inadequacies of training on the flat, I would  never have achieved my goals.

Initially I set up the in-built programs to decide my training program and monitor my fitness, but soon found that I could not customise the programs sufficiently to match my training sessions, which were largely determined by my immediate environment ie steep roads, hills climbs with steep descents, and flat walking tracks.

Its most valuable feature was its ability to detemine aerobic fitness (VO2) levels to a high degree of accuracy, but simply attaching the heart rate monitor and resting for 5 mins, while it did some sophisticated analysis. Reading the literature shows that the readings it provided closely correlated with those measured by highly sophisticated laboratory testing equipment.

Over the year, my fitness level, as measured by my Polar watch, went from 46 to 52 (VO2 ml/kg/min) which meant that I had improved  from that of an elite 50-59 year old to that of an elite 20-29 year old. Great positive reinforcement!

The training sessions and the pain had all been worthwhile!

WARNING:  Try to make the speed at which you are walking as realistic as possible (3-5 kph) by gradually increasing the weight you are carrying as you get fitter. Walking at too high a speed produces unnnatural leg and arm actions which can lead to soreness and don't really help your fitness. I monitored my speed using Walkmeter and whenever it got too high or plateaued I added some more weight.

Eight additional  fitness posts available in this blog


  Creative Commons License This article by Bush Walker is licensed under a Creative Commons Attribution-NonCommercial-ShareAlike 3.0 Unported License.

Saturday, March 19, 2011

Bushwalking Navigation | GPS vs Paper Map vs iPhone

Which is better for navigation, your GPS or a paper map? What are the strengths and weaknesses of each? Do you need to carry both? Are there any alternatives to a dedicated GPS and map?
In bushwalking circles there are always vigorous debates about which is best, a dedicated GPS or a topo map?  This is sometimes generational with older members preferring the map, with which they are familiar, and younger bushwalkers preferring the GPS. To some degree the dictum "each to their own" applies in bushwalking as a walker who doesn't understand how their GPS works is a danger to themselves and others in their group and would be much safer navigating with a map .

Of course the argument is not that simple, as many modern GPSs now contains maps which can be viewed and overlain with waypoints and your current position. You can now take your digital maps with you when you walk. Fortunately the opposing viewpoints are not exclusive as it is possible and in my view essential to take both, especially when bushwalking in difficult terrain.

I love to walk "thumbing " my laminated map which allows me to get the "big picture" around me, orientate myself using distant features and anticipate what's around the next corner. I do however use my GPS to check my location at each stop or at critical "decision points" such as creek junctions, waterholes or ridge descents.

Paper maps have some disadvantages:
  • they get damaged easily, especially at the folds, and require laminating
  • they are cumbersome in a strong wind if you have to open them
  • multiple maps are often needed and changing from one to another in your map case is often difficult
  • they require special storage facilities at home
  • the printing is often too small to see without  reading glasses.
HINT: try laminating your maps in A4 sections, with maps both front and back, which will fit individually into your map case.

Paper maps do however still have many advantages:
  • they allow you to orientate yourself using distant features
  • they can't go flat as they don't rely upon batteries
  • they may be more waterproof than your GPS, especially if you are using a "smartphone"
  • they are cheaper in the short term 
  • they work even under a dense forest canopy trees or in narrow gorges.
A GPS has several advantages over paper maps:
  • it can compactly store large amounts of data, plotted on a large desktop computer screen, and then uploaded via a cable, infrared, bluetooth or wireless.
  • if the GPS has a large colour screen and sufficient memory then you can store a large number of maps, which can be scrolled and zoomed. You need never go off the map as they will be seamlessly "stitched together".
  • it allows you to determine your location quickly with high accuracy and reliability, subject to several limitations: not under a dense forest canopy trees or in narrow gorges.
  • if you have a large touch screen (eg iPhone) then you will be able to effortlessly scroll and zoom, so that your reading glasses are never needed.
Of course there are many features they share, such as the ability to determine location. Experienced map users will be able to lay a compass on their map and do a resection using prominent features to find their current location. Even better they will have "thumbed" the marked route on their map from the beginning and never become lost!

Alternatives to a dedicated GPS

There are alternatives to a dedicated GPS such as a  smartphone, many of which have large colour touch screens and excellent built-in GPS's. The iPhone is a good example of such a phone, and as most bushwalkers should be carrying a mobile phone with them anyway, this can serve as a good back up for those who prefer to use maps but don't want the expense of purchasing a dedicated GPS. There are several excellent mapping apps (applications) which are very easy to use on the iPhone and while they don't match a dedicated GPS for versatility, they only cost a few dollars.

The iPhone does however have two major limitations: battery life and lack of waterprooofness, but both of these can be overcome with solar panels and waterproof covers.

Read more about the uses of the iPhone for bushwalkers

Related Posts

Can my GPS replace My Map?
Why am I Lost When I Have a GPS?
How to Keep your iPhone Charged in the Outdoors 
Bushwalking Navigation
GPS
Smartphones

  Creative Commons License This article by Bush Walker is licensed under a Creative Commons Attribution-NonCommercial-ShareAlike 3.0 Unported License.

Sunday, January 30, 2011

iPhone Apps for Bushwalkers Visiting New Zealand (NZ)

Want to check the weather in NZ? Listen to streamed radio? Find Public transport in Auckland or Wellington? Book an Air New Zealand Flight? Calculate distances and times between towns? Find wifi access or budget accommodation? NZ Snow report? Navigate roads? Identify birds and their calls? View topographic maps?
 There are certainly a large number of iPhone apps available to bushwalkers/trampers and I have reviewed many of these in a series of previous posts, some in detail and others briefly.

This post looks at 15 or so iPhone apps from the perspective of someone who is planning to tramp in NZ or has arrived in New Zealand and wants to add some local flavour.  To make it easier, I've grouped these and provided a brief synopsis, taken directly from iTunes. Where I have actually used the app I have provided a more detailed review

Weather
  • Weather NZ

    Get the latest weather forecasts from New Zealand's own MetService forecasters. Up to date, marine and general forecasts for all New Zealand Urban areas. WeatherNZ also lets you chart tidal data for all Primary and Secondary ports around NZ, plus lets you see latest Situation isobar image as they get released. Snow and Surf reports are updated directly from snow.co.nz.

  • New Zealand Snow Report

    Get your New Zealand snow reports on the go, for free, with SnowReports.co.nz and your iPod Touch or iPhone. Whether you are on the road or still lying in bed you can instantly check the weather, road and lift conditions at your favourite NZ ski areas. Or, if you are trying to decide which ski area to go to, simply browse conditions at ALL of them! The free SnowReports summaries include: Mountain name, Weather status, Road conditions, Number of lifts open, Snow base depth, New snow depth, Temperature, Wind, Time last updated
Transport
  • Timetable NZ

    If you're a user of public transport in Auckland or Wellington then this App is for you. Find bus, train, ferry and even cable car schedules for public transport in greater Wellington and the City of Sails. Store frequently used routes in a favorites list and view the next three departures on those routes in a convenient initial page. View the location of your departure station within Google Maps in relation to where you are now to help you find where you should be going. Best of all, these schedules are all stored on your iPhone or iPod meaning that you don't need to have a network connection to use the App.

  • Air New Zealand-mPass

    With mPass on your iPhone or iPod Touch you can: View up to date details of all your flight bookings. Go straight to the gate when travelling within New Zealand without bags. mPass acts as an electronic boarding pass. The mPass boarding pass is also recognised by Air New Zealand airport kiosks. Just scan your mPass boarding pass to collect baggage tags when travelling domestically with bags. If you're a Koru member, scan your mPass boarding pass for entry to the Koru Lounge.
Tourism
  • Find NZ

    Find! NZ is a New Zealand local search engine based on location awareness. The app uses an open source database from Zenbu. (www.zenbu.co.nz) Features: Online & Offline search. Search the nearest points of interest by predefined 43 categories. Custom search by any keywords from your keyboard entry.  Phone call, Open website, Send email, Send SMS and Map. (phone call available on iPhone only) Add, Edit Entries - You can add/edit entries in App. (Online only) Option to choose location control : GPS or Manual setting. Option to choose the max number of search results to display. (200 max) Special offers provided by Arrival NZ Magazine. (Discount coupons/Free stuffs)

  • NewZealand.spot-on

    Browse activities and destinations by region and then save them for quick access upon arrival. Save and share your adventures back home by creating custom Postcards with your photos and then posting them to social networks.
    Highlights: Works offline so that you can plan your trip during your Air New Zealand flight 1500+ pre-loaded activities and destinations organized by geography/region. Postcard builder with dozens of frames, stamps, and captions to make fun vacation snaps for friends and fans across Facebook and Twitter. Travel Notes area for backing up important names, numbers and trip detail.  Recommendations from local bloggers and recent travelers. Automatic content updates of additional activities and events
    Helpful tools include: WiFi Finder – lists cafés, libraries, and other known establishments with wireless access. Distance Calculator – estimated driving/flying times between towns. BBH Hostel Network – full list of budget accommodations and amenities across the North and South Islands. iSite Kiosk Directory – New Zealand’s official travel information resources. Kiwi Translations – learn the lingo so you can order your coffee just right.  Map of New Zealand – pinch, zoom, plot, escape.  Book a flight – direct access to Air New Zealand flight bookings and deals


  • Zenbu

    Find Everything from Zenbu instantly on your iPhone, no network connection required. www.zenbu.co.nz is a local search engine for New Zealand (and only NZ) places, products & services with over 80,000 listings including restaurants, cafes, accommodation, hairdressers, service stations, banks, ATMs and more. With this app you have the name, address, phone, website, activity description and opening hours all at your fingertips. Zenbu is the perfect reference tool for locals and tourists.

  • Lonely Planet Auckland

    # easy to use – swipe to scroll through a full table of contents, dip into sections, and turn pages with a flick of your finger # offline maps – there’s no need to go online to access our detailed street maps, fully retooled for the iPhone with location awareness, multi-touch controls, full-colour styling and six-level zoom # tons to see and do – choose how to search through hundreds of geo-coded points-of-interest (POIs) – by proximity, category, preferences or favourites – then just tap to visit the website, or place a direct call # text search – whether you’re into ‘live music' or ‘fine dining’, every article and POI in your guidebook is text-searchable # location-based navigation – plot your location in real time on our interactive maps, exploring back streets and hidden treasures with no danger of losing your way # worth a thousand words … – if you need some inspiration, just thumb through images taken by our award-winning photographers # personalisation – tailor your City Guide to your tastes by tagging the best POIs as ‘favourites’ # money saving – forget roaming costs, our apps are designed for offline use, and only take up the room of an average album on your iPod
Navigation
  • MapApp NZ

    MapApp NZ South Island displays full topographic maps of New Zealand's South Island. Explore the South Island on your iPhone or iPad.  Find your current location on the map using the built-in GPS.Search for place names. MapApp includes all the map data with the app, so maps can be displayed even when you have no cellular coverage. The map data is derived from the latest LINZ 1:50000 scale Topo50 series.
  • Google Earth

    Navigate the world with a swipe of your finger. Swipe with two fingers to adjust your view to see mountainous terrain. Show the Panoramio layer and browse the millions of geo-located photos from around the world. View geo-located Wikipedia articles. Use the Location feature to fly to your current location. Search for cities, places, and business around the globe with Google Local Search. Nav4D New Zealand
News
  • New Zealand Radio Streams

    Alarm Clock Sleep Timer Search by radio name,  Graphic Equalizer, Favorites list, History of last played stations ,Regular updates over the air, Customer service support, Song title and artist name (when available), iPhone 4 Retina Display icon, Recording, Facebook & Twitter support, Advanced Alarm Manager - Multiple Alarms, Day Selection, iPod music / Radio station and more, Transfer Recordings to your computer with iTunes USB File Sharing (iOS 4.x), "Wifi only" On/Off switch (setting can be found in the main setting app under Radio)

  • New Zealand Radio Stations

    The Tunin.FM New Zealand Radio Stations application allows you to listen to New Zealands radio stations whilst travelling. You no longer need to switch frequencies when travelling across different coverage areas. You can now even listen to internet-only radio stations or local stations whilst travelling and anywhere you like. Enjoy radio in digital quality on the train, the bus, in the car and on your bicycle. The Tunin.FM-application does not require a Wi-Fi connection. With this app, even mobile internet connections which are sometimes slow (i.e. 2.5G/GPRS) allow you to listen to good quality radio. It is easy to save your favourite radio stations on the list of favourites and an automatic record is kept of the radio stations you listened to most recently the next time you start the app again.
First Aid 
  • St John NZ CPR

    St John is the leading provider of first aid training in New Zealand as well providing ambulance services to 85% of the population. This application teaches the life saving skills of cardio-pulmonary resuscitation, commonly known as CPR. Knowing how to save a life of a family member, friend or colleague is vital, so why not get this application now so you have it on your phone. You never know when you might need it and it is FREE.
Field Guides
  • What Bird NZ

    WhatBirdNZ provides a concise pocket reference guide to many of the interesting birds that can be seen around New Zealand. Not only does it allow you to hear and see them but it also provides interesting trivia in a fun "Top Trumps" style card format. Also when in this view you can rotate your iPhone/iPod to see a zoomed in photo.
Similar Posts: 

iPhone

  Creative Commons License This article by Bush Walker is licensed under a Creative Commons Attribution-NonCommercial-ShareAlike 3.0 Unported License.

Saturday, January 29, 2011

Bushwalking Navigation | Using Topo50 Maps (LINZ) for Tramping in New Zealand

Want to plan your NZ tramp using digital topographic maps? Like to view NZ Topo50 maps on your iPhone or Mac? What sorts of maps are best for tramping?  How do you select the appropriate map? How can you load and calibrate these maps on an iPhone or Mac computer? What are some of the technical problems?
New Zealanders are certainly lucky to have high quality recent produced raster digital topographic maps (300dpi) available for download for FREE , and despite some controversy, the change to NZGD2000, which is equivalent to the universally used WGS84 for bushwalking purposes, has brought some bonuses for those of us who like to use NZ maps on our iPads and iPhones. There is no doubt that for tramping a 1:50K topographic map is needed and  for steep terrain a 1:25K map is even better.

Navigation Apps

Many newer mapping programs that may not have been able to use the old NZGD1949 datum, but do have the newer WGS84 datum installed, are now able to be used by bushwalkers/trampers in NZ. Two of my favourite navigation apps,  Bit Map for the iPhone and MacGPS Pro for the Mac computer can now view and use the latest NZ Topo50 (1:50K) and Topo250 (1:250K) maps. No doubt any GPS that is able to load non-proprietary maps will be able to used these maps too.

Land Information New Zealand (LINZ)

The new Topo50 and Topo250 map series are available for download from the Land Information New Zealand website in two formats
  • geoTIFF (141 Mb for a typical map) (no map legend or margin, but includes embedded calibration data to allow automatic georeferencing and alignment of adjacent maps)
  • TIFF (214Mb) (includes the legend and margins, identical to the paper version)
Map Selection

The first step is to decide which map you wish to download and this can be done by going to the LINZ Map Index page and selecting the appropriate 1:250,000 map. Once you have selected the correct large scale map, clicking the large grid square, will reveal twenty five, 20 km x 20km 1:50,000 maps which can then be individually selected for download.

Loading Topo Maps into your Map Viewing App

Bit Map requires that you first convert the geoTIFF map image file ( no margins or legend) into a form that it can read and labels .bitmap. This can be done within your iPhone or  using a desktop application, such as those available free of charge on the developers website, which optimises the files for use prior to loading into your iPhone. The optimisation process splits the large geoTIFF image file into a large number of smaller tiled JPEG image files which have been produced at a much lower resolution to reduce loading time. This optimised format is very similar to ozf2 format, which means that if you already have files of this type from a program such as OziExplorer (not version 3), they should load without the need for any optimisation.

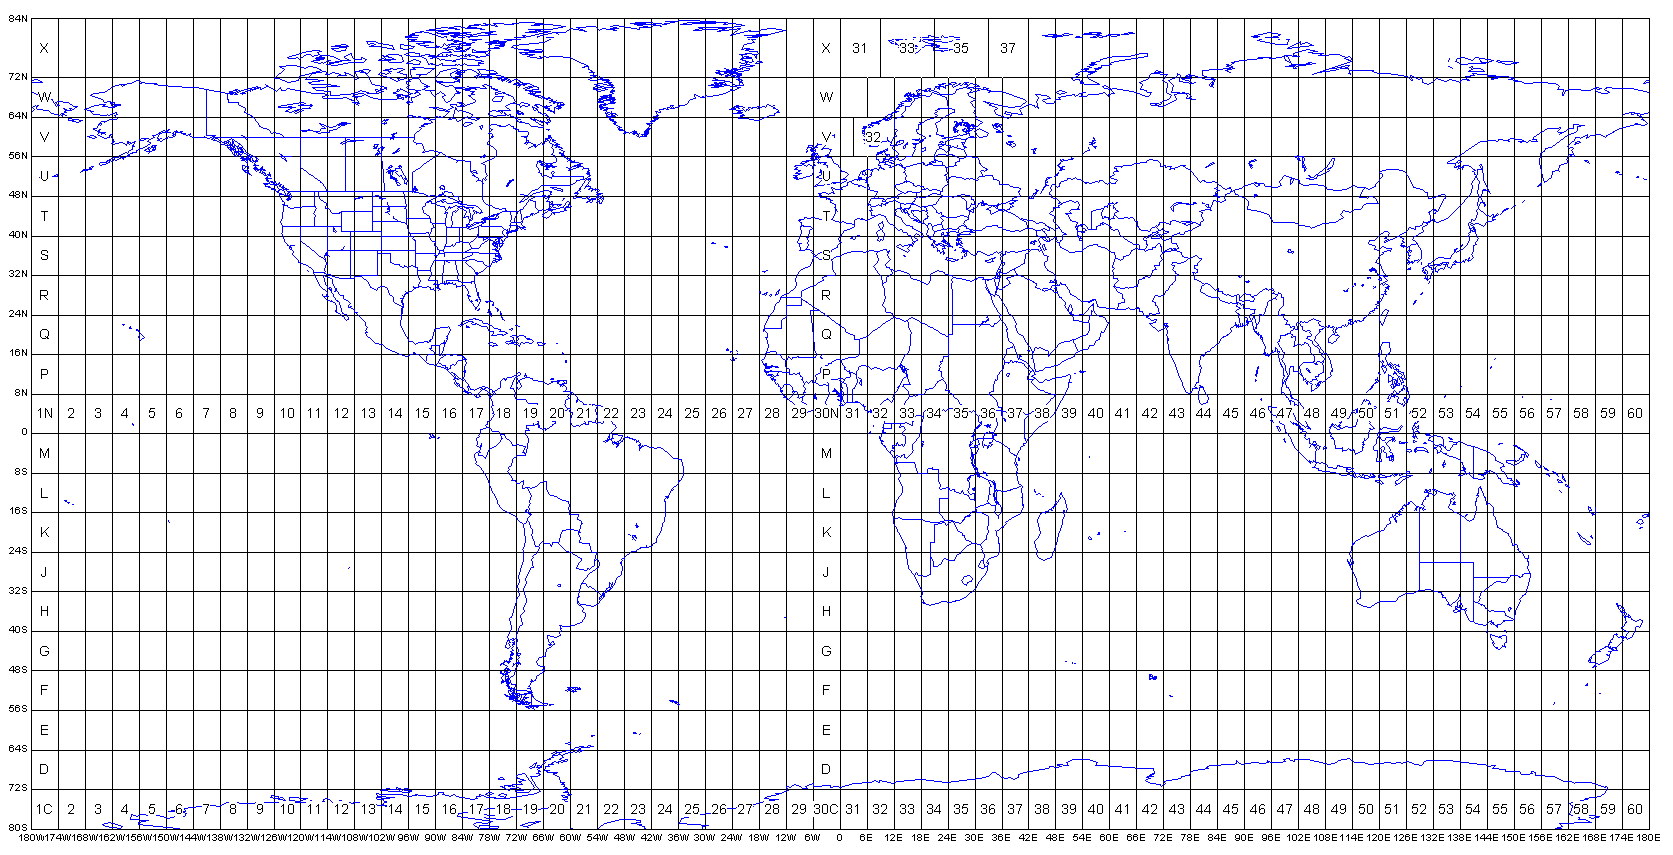
The next step is to calibrate the file, which requires a knowledge of the grid references of the corners of the map and the grid zone name. For the Routeburn track this is 59G. The grid references of the corners of the map (extents) can be found from the LINZ website, where it is possible to download the data as a text file, spreadsheet (preferred so you can change the order of the data) or view on the screen.

World UTM Grid Zones by Alan Morton

View an enlarged map
MacGPS Pro first needs to convert the geoTIFF image file into PICT format, which while no smaller, is the format used internally by the program. Once imported the file is automatically calibrated by  the user when the correct units (datum: NXZGD2000 and grid: NZTM2000, km, m, magnetic or true) are chosen and the file saved.

Check you have it right by finding the coordinates of a known point on the map and see whether they correspond to that on the TIFF or paper map

View Similar Posts


Creative Commons License
This article by Bush Walker is licensed under a Creative Commons Attribution-NonCommercial-ShareAlike 3.0 Unported License.

Monday, January 17, 2011

Converting Map Coordinates for Bushwalkers | Latitude, Longitude to/from UTM

Ever wanted to understand what the numbers on the lines on your map are? Does your iPhone app only register latitude and longitude and you need to convert it to UTM (Universal Transverse Mercator) or vice versa. Need to be able to tell your local emergency service the latitude and longitude of your location for a rescue?
There are at least three ways to convert between coordinate systems or formats eg UTM grid references to latitude and longitude
  1. using an online Web Converter (see below for examples)
  2. install an iPhone App which does it for you (see below for two)
  3. change your GPS  coordinate format settings and see the converted result
A word of warning from Professor Dutch
"Caution! Unlike latitude and longitude, there is no physical frame of reference for UTM grids. Latitude is determined by the earth's polar axis. Longitude is determined by the earth's rotation. If you can see the stars and have a sextant and a good clock set to Greenwich time, you can find your latitude and longitude. But there is no way to determine your UTM coordinates except by calculation." (Source: Steven Dutch, Natural and Applied Sciences, University of Wisconsin - Green Bay)
UTM
"Universal Transverse Mercator (UTM) coordinate system is a grid-based method of specifying locations on the surface of Earth. The UTM system divides the surface of Earth between 80° S latitude and 84° N latitude into 60 zones, each 6° of longitude in width and centered over a meridian of longitude. Zones are numbered from 1 to 60. " (Source: Clever Applications)
Some Online Web Converters

iPhone Apps
Map Tools screenshot

Map Tools By Richard Hoffman
"Map Tools is an iPhone app  that let users to fully utilize coordinates. Map Tools converts coordinates among various datums, coordinate systems and map projections. It also calculates distance between two coordinates. It supports coordinates conversion between geodetic coordinates, UTM, UPS, MGRS and map projections in up to 232 datums. The app is delivered with WGS84 ellipsoid and used as the default datum. You can purchase an add on that will provide you with an additional 232 datums, which include NAD27, ED50, OSGB36, EGSA87, AGD66, AGD84, GDA94 and a lot more." (Source: iTunes Apps)
NB for Australians WSG84 (supplied) and GDA94 are almost equivalent so if you are only using this datum there is no need to buy the extra 232 datums. 

Bit Map by Nixanz 
Bit Map by Nixanz
Bit Map is a map viewer app with some basic GPS features, and simultaneously provides both the UTM and latitude/longitude coordinates in decimal degrees for any point on the uploaded map you are viewing. While it doesn't convert between map coordinate systems, it will give both for any location and datum.
Read my Review of Bit Map

Using your GPS to convert

If you open the settings field on your GPS, you can change between the coordinate formats offered eg UTM to Latitude and longitude etc and all coordinates entered in the original format will then appear in the new.


Social Bookmarking

Visit my Delicious bookmarks to discover some popular web resources on this topic.

Further Reading

Creative Commons License
This article by Bush Walker is licensed under a Creative Commons Attribution-NonCommercial-ShareAlike 3.0 Unported License.

Tuesday, December 21, 2010

Bushwalking Rescue: Emergency Communications by Cell or Mobile Phone

What sort of mobile phone do I need? Which service providers should I use? How should I ensure adequate signal strength? What number should I call?  When should I call 112? When should I call 000? What information should I have ready?
 I've sometimes been surprised about how good mobile (cell) phone reception is when you have  line of sight.  Frenchman's Cap in the central highlands of Tasmania to Mt Wellington, Hobart...70 km.  Is it possible? With such good reception then  the mobile phone becomes a viable communications tool for rescue. You can check reception in advance by viewing the service providers coverage maps, but these won't show isolated locations where reception is exceptionally poor or surprisingly good, usually due to local terrain.

Choosing the right mobile phone is important if you want to use it for emergency communications. You must choose a phone with a decent internal antenna and these are referred to by Telstra as "blue tick" phones which means they are suitable for regional  reception areas in contrast to metro use only. You must choose a service provider which has good regional coverage and Telstra has the best coverage by far. If you are a serious bushwalker who wants to be able to use their mobile phone for communication in the wilderness then you have no choice!

How do you know if your signal strength is adequate for a call? 

Most of us can read the signal strength indicator, but this can be annoying as you continually have to take the mobile out of your pocket to check the symbol. If you have an iPhone, there is an app which will tell when you have moved into an area with adequate signal strength, even if the phone is in your pocket.
No Signal: No cell service? In a dead zone? want to be notified when you can make calls again without taking the phone out of your pocket? 
If you need to make an emergency call and don't have adequate signal strength then the best thing to do is to head for high ground. While you may not have voice communication you may be able to send an SMS. If reception is poor be aware that you phone will turn up the power in order to get reception and this could flatten you battery prematurely. Leave your phone turned off unless you need it.

Dial Triple 000 NSW Police
If you have a recent mobile phone, you may be able to dial triple zero 000 to get emergency help from any nearby service provider. The better alternative, if you have an older phone is to dial 112, the internationally recognized emergency number. This number allows you phone to roam between service providers and to get the best service available.eg if you use Optus or Virgin then dialing 112 will allow you to use whichever tower is closest, most probably Telstra. It also allows someone finding your phone to call even when it is locked or turned off. A good reference is on the Australian Communication  and Media Authority's  website Calling the Emergency Call Service from a mobile phone: FAQs

What information should I have ready for the emergency call service operator? 

Well, one obvious thing they will want to know is your location and they won't want a grid reference. You must be able to give them latitude and longitude, which is available from your map or GPS if you know how to get it or perhaps you can convert it if you have the appropriate iPhone  app .
Map Tools: utility that lets users fully utilize coordinates. Converts between datums, including AGD66, AGD84,GDA94, NZGD49, coordinate systems, and map projections and calculates distances.
It is a relatively simple task to change the units on you GPS so they give lat & long instead of grid references. It's not difficult to read the latitude  and longitude from your map.  Next best is to give them the distance and direction to a prominent feature nearby.

What information will they need from you?

The St John's Ambulance suggests their staff should collect the following information:
Type of Incident
• Caller name and call back number
• Location of incident and where possible a location name
• Map reference
• Radio Communications/Frequencies
• Number of patients
• Medical category applied to tasking (SJA use)
• Diagnosis / presenting problem
• Patient details if available
• Type of injury or illness
• Type of terrain and hazards (ie. high tension or power lines)
• Weather conditions in the area
• Identify any obvious landmarks or potential landing sites
See also  Emergency Call-ins  This article provides a structure for emergency contacts in bushwalking clubs and schools to respond to callers.  

This section is from the Outdoor Action Program's Guidelines for Handling Emergency Situations and is not contained in The Backpacker's Field Manual. Copyright © 1999, all rights reserved, Rick Curtis, Outdoor Action Program, Princeton University and Random House Publishing, New York.

Have you had any experience using a mobile phone to summon emergency help? Let us know how it worked for you, by commenting.

Creative Commons License
This article by Bush Walker is licensed under a Creative Commons Attribution-NonCommercial-ShareAlike 3.0 Unported License.
Thursday, December 16, 2010

Choosing the Ideal Bushwalk Camera

What characteristics should the ideal bushwalking camera have? Will a smartphone do instead? Is a full blown DSLR needed? What about for those poster size prints?

I  am continually looking for the ideal bushwalking camera and each year I seem to get closer with each new product release.  But each year I keep adding new "must have" features to my list, so I never actually get there.

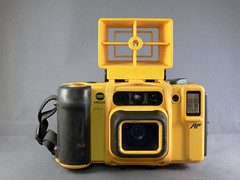
I remember having a Minolta Weathermatic 35 DL waterproof  film camera  in the late eighties with which I was very satisfied. It had limited zoom and macro, auto-focus, replaceable batteries, and could be used underwater with its special sports viewfinder.  It was way ahead of its time! I thought it did a great job at the time. But things have changed; cameras are smaller, have better zoom and the automatic settings make them truly point-and-shoot cameras!

Minolta Weathermatic 35DL with sports finder by Marty4650

The ideal camera needs to be weatherproof, lightweight, have both  zoom, wide angle and macro lens, with video capabilities, have a battery that lasts for the duration of your walk or is easily replaceable, have a screen that is visible even in bright sunshine, have a GPS and have ...... the list goes on. With each new model release the features become more impressive.  Panoramic stitch, HDR, face recognition and focus, automatic backlight, 15 megapixel....Will I ever be satisfied?

The answer is probably no. Each year my children get my reject camera as I progress to the next model. Each year, my ideal digital camera changes a little, but the core requirements for me today are:
  • big zoom and wide angle
  • lightweight and compact, hence single lens
  • GPS for geotagging photos
  • full automatic with intelligent processing that I can depend upon
  • replaceable lightweight batteries, preferably Li-ion to save weight
  • screen that works in bright light or better still an optical viewfinder
  • high quality video capabilities
  • 5-10 mega pixels
  • built in flash
  • ability to easily connect o my computer and TV screen
Can a smart phone meet all of these requirements? The iPhone 4 goes close, as do high end Nokias and probably many others. There are many situations in which a smartphone would be more than adequate and would meet most of my core requirements. The main problem is that to fit the features into such a small space, compromises need to be made. See some of my other iPhone posts for more details.

Is a full blown DSLR suitable? Not for me; too heavy, bulky and only in poor light are the photos better. The equivalent of my Panasonic FZ35 18x zoom would weigh a ton in a DSLR. Possibly OK on a day walk, but I don't have the room or want the additional weight  for an extended walk. With even point-and-shoots having as many as 15 megapixels, poster size prints are feasible without needing a DSLR.

When I eventually master taking good creative shots with my point-and-shoot I might want to print poster size prints or take shots in difficult light conditions, but until then I'll concentrate on getting interesting, creative shots, for which I don't need a bulky, heavy DSLR.

Want some recommendations on particular models ?

Creative Commons License
This article by Bush Walker is licensed under a Creative Commons Attribution-NonCommercial-ShareAlike 3.0 Unported License.

Friday, November 19, 2010

Using your Smartphone to Monitor Fitness Levels for Bushwalkers and Hikers

Do I need to train for bushwalking? What is the best way to train for bushwalking? What should my goals be and how do they vary with increasing age? How can I motivate and monitor my fitness program?
As your age creeps up a structured training program becomes more important because your fitness level falls away rapidly after a short break from walking and takes longer to re-establish. Younger walkers can maintain their fitness between serious bushwalks with minimum effort, but as you get older, walkers must fit exercise into their daily routine.

Daily fitness activities are essential, not only so you won't get left behind on a walk, but also because exercise and diet are keys to keeping the good HDL high and the triglycerides low, both essential for lowering the risk of heart disease. I find the best type of exercise is that which closely replicates the terrain you will be walking. If you are going to be carrying a heavy pack, do so in your training;  if you are going to be hill climbing, do so ; if you are going to be climbing down steep slippery slopes, do so.

I don't find that gym work is entirely effective as it doesn't work the same muscles. Sure, it will improve your aerobic fitness, but will it train the muscles that need to support your legs under a heavy pack as you move down a steep slope?

Motivation and accurate monitoring are keys to improving your fitness level. I need to know whether I have improved each day, has my speed increased, did I get to the midpoint sooner than yesterday, am I fitter now than this time last year?

Fortunately technology, which allows you to compare times on walks, is available

There are three main monitoring devices, all of which do a similar job :
POLAR wristwatches with heart rate monitor strap: upload to you computer or watch
Nike  shoe sensors (iPod, iPhone): senses movement and upload to you upload to iPod, iPhone from where it can be uploaded to a dedicated website for analysis

The  advantage of these systems is that you can upload your data from each walk to a website for analysis and share it with others, even view it real time. Some products have exercise programs in-built from which you can choose.

I have extensively used two smartphone programs:

Sports Tracker (free Nokia app)

This free program has allowed me to keep track of my daily exercise program by allowing me to compare times, look at split times and I have even used it to record day walks, using the inbuilt GPS, and uploading geotagged photos taken along the trip with my Nokia phone. Certain models allow you to link with a heart rate monitor and record heart rate at the same time. The major problem I find is that the new version doesn't allow me to group walks by route, which means that I am unable to compare times over the same route. This means that it no longer meets my needs and I have moved on to the iPhone app Walkmeter below.

Walkmeter (iPhone app $5.99)

This program does most of what Sports Tracker does but does something that Sports Tracker doesn't do and that id compare walking routes.  I particularly like its ability to monitor progress and give audio  feedback along your walk eg how far you are ahead of your median time or behind your best. This means you don't need to take your smartphone out of your pocket at all when its raining. Just like the Sports Tracker, it multi-tasks allowing you to listen to your favourite music as you walk.  See your results on maps, graphs, and a calendar, and organized by routes and activities. Summarize your statistics by day, week, month, year, and overall. It does not incorporate photos like Sportstracker, but I rarely take photos on a training walk.

iSports Tracker (iPhone app $5.99)

iSportsTracker for iPhone 3G, 3GS and iPhone 4 enables you to track outdoor sport activities like running, biking, walking, hiking, skiing, skating and more. iSportsTracker tracks your speed or pace, distance and calories burned, draws your track on a map, takes photos, uploads your tracks and photos to various online services like RunSaturday, MapMyTracks, EveryTrail, Picasa Web Albums, can send training data by email in GPX, KML or CSV formats and even can post a Tweet! (Free version available)

If you are really keen there are iPhone apps (pedometers) that allow you to determine your paces per minute  and choose appropriate music with the same beats per minute (BPM)

Wristwatches

These use blue tooth to link with a heart rate monitor. They perform sophisticated calculations to make sure that you are exercising in the correct heart rate zone and have inbuilt programs from which you can choose. The results can be uploaded to a website for analysis in the newer models. Unless you prefer the small screen of a wristwatch, then the smart phone ( eg Nokia) with heart rate monitor is the way to go. The Polar brand of wristwatch is the market leader and has been around for a long time.
Creative Commons License
This article by Bush Walker is licensed under a Creative Commons Attribution-NonCommercial-ShareAlike 3.0 Unported License.