Showing posts with label technology. Show all posts

Wednesday, January 15, 2014

Bushwalking Equipment | Can I Really Do Without a Smartphone?

As a bushwalker, can you afford not to own a smartphone? Which smartphone apps can replace dedicated equipment? What are the limitations?

Over the last few years technology has made smartphones invaluable to bushwalkers, replacing many of the devices, which previously had to be bought and carried individually.

Probably the first device carried by bushwalkers to be incorporated into the iPhone was the still and movie camera. Today's smartphone has a high quality camera which can take video and stills, including panoramas, mark each with the location at which the photo was taken, and then upload it to the web using wifi or mobile (cellular) data.

Next, the GPS became available, allowing routes to be mapped live, waypoints determined and marked, and distances accurately determined. Recently, apps which allow the viewing of calibrated digital maps have become commonly available, and some apps now incorporate the navigation features found in a dedicated GPS. High resolution colour screens make viewing these maps and navigational features easy. Modern smartphones have built-in compasses which can be calibrated and are accurate enough for the day walker, but not accurate enough for bearings over long distances.

Then high quality heart rate sensors came on the market which could pair with a smartphone, initially using a "dongle" plugged into the earphone socket but more recently using low energy interference-free Bluetooth.
 Some apps even use the smartphone camera and built-in light to measure blood flow pulses in a finger, without the need for an independent sensor. Fitness training had become more scientific!

The next advance was the ability to measure heart rate variability (HRV) (see previous post), using the powerful analysis capabilities of modern smartphones. Initially measuring HRV was only possible with expensive laboratory based equipment, but soon Polar had incorporated this ability into some of their top-of-the-line wrist computers. In the last few years, this technology has migrated to the smart phone, allowing bushwalk training to be fine tuned.

Bush walkers visiting remote areas often feel the need to take emergency devices with them to obtain help if an emergency occurs. We are all familiar with personal location beacons (PLBs) which can transmit a message, including location, to an overhead satellite, and from there to emergency rescue services.


SPOT gen3 s can send a message via satellite to your emergency contacts or to the same rescue service. Version three is much better functionally according to the reviews, but has a more expensive subscription.

Recently smartphone apps (GetHomeSafe) have become available which can send an SMS or email, if a bushwalker fails to return on time, without the need for any action by the "injured" or "lost" person or instantly in a critical emergency to a contact list or even rescue services directly, including the current location, participant details and a route plan. "You don’t need a working phone (be within range) or even to be be conscious for an alert to be sent."

Bush walkers on day walks and within range of a mobile tower, up to 70 km from a high enough vantage point, can add weather and tide apps  and the ability to visualise routes or places in 3D using Google Earth.

We now have GPS, fitness, navigation, mapping, emergency notification and weather services available at low cost in the one device! The only problem is a lack of battery capacity, but even this can be overcome to some extent with a solar charger.
What is next?
How do you overcome these limitations?
Where will the future take us?

  Creative Commons License This article by Bush Walker is licensed under a Creative Commons Attribution-NonCommercial-ShareAlike 3.0 Unported License.

Tuesday, January 14, 2014

Bushwalking Fitness | Pt 3 My Choice of Smartphone Apps for Fitness Training

Which apps should I choose to monitor my fitness? How should they be integrated? How should I fine tune my training, using the data collected?

As mentioned in the previous two posts, Part 1 and Part 2, technology incorporated into the smartphone and low cost, high quality apps now enable bushwalkers to monitor their fitness and training program in a way previously only achievable by elite athletes working in an  exercise laboratory. Both of these posts should be read as they provide necessary background for this post.

To maintain a high level of fitness, the bushwalker needs to be able to
Many of these can also be monitored by advanced wrist computers incorporating GPS and heart rate monitors, but these usually lack the versatility of a smartphone.

Measuring Personal Fitness

Polar Beat has an in-app purchase which allows your to do a Fitness Test (see previous post for more details) which you can then match with VO2max norms for your age and gender. This should give  similar results to the values produced by Polar OwnIndex® found in many of the high-end Polar wrist computers, but I have found them to be about 5 points lower.

iThlete, BioForce HRM, and HRV4training use HRV as an indicator of fitness, with higher values indicating higher fitness levels. I am currently trialling both iThlete and HRV4training and may continue with both, as they offer slightly different but important features.

iThlete enables you to log important "environmental" factors such as sleep, fatigue, training load, muscle soreness, stress, mood and diet and check for correlations with HRV scores. HRV4training automates the HRV measuring process, giving the option of lying down or standing or both. If this option is chosen, the difference between standing and lying down is automatically calculated and can give valuable information about fitness, as the difference increases with fitness.

Logging Training Sessions

Precision Pulse HRM monitors, HRaverage and HRmaximum, kCal burnt, and training load, as measured by an objective TRIMP score, determined by time in each training zone and heart rate. Without this knowledge, training loads become rather subjective, especially if there is variation in the type of activity, volume and intensity, and therefore affect the reliability of the HRV data.

I have been using Walkmeter ( Apple) for about 5 years and find it to be an excellent app for maintaining a log of your training sessions, including GPS location, Activity, Route, kCals, Heart Rate, Elevation climbed and Duration, which can then be graphed and mapped or viewed live. Most importantly it is very user friendly, making excellent use of the remote controller on the earplug to control start/stop, playing of motivational music and user defined voice announcements such as pace, time, progress in relation to worst, medium, best previous times for the route. This means you don't have to take your iPhone out of your pocket to control the app. It has the ability to automatically stop if you are stationary for more than a user defined duration, which is very handy. All of this information can be shared live using social media, if you are so inclined.

Polar Beat offers some of the above features  such as measurement of distance, calories, speed, heart rate, and provides voice announcements and map location,  but appears to be not yet fully developed. It does however integrate well with the Polar website.

Planning Future Training Sessions

Both iThlete and HRV4training provide bushwalker friendly advice about the day's training session by relating  the morning's heart rate and HRV measurements to previous days.

Careful analysis of data provided by Walkmeter, such as average and maximum heart rates, time in each training zone, and duration in relation to previous times, can provide a limited guide, but lacks the predictive ability of the first two apps..

Social Media and Web Integration

Many fitness apps allow social media integration with Facebook and Twitter, and may allow upload to a proprietary website, for more detailed analysis.

Related posts

Bushwalking Fitness | Pt 1 Smart Phone Apps to Fine Tune your Bushwalk Training
Bushwalking Fitness | Pt 2. Using a Heart Rate Monitor and a Smartphone to Measure Fitness Variables


  Creative Commons License This article by Bush Walker is licensed under a Creative Commons Attribution-NonCommercial-ShareAlike 3.0 Unported License.

Sunday, March 24, 2013

Bushwalking Fitness | Am I getting fitter?

How can you tell if you are getting fitter? Do you need to buy a heart monitor? Can your smartphone tell you? Can body composition weighing scales help?
My last three posts (see below) discussed how to plan a "get fit for bushwalking" program, how to make sure that each session is effective and that you are not doing more damage than good........ but is it working?

If you are not technology-minded, then it's easy; simply check your watch to see if you are getting any faster on a fixed route. If you enjoy using technology, then it can be a great motivator to watch the improvement, but take great care, as a single score, without supporting data, is often unreliable.

Some signs that you are getting fitter include:
  1. Heart Recovery Rate increases
  2. Resting Heart Rate decreases
  3. Time to complete a fixed route decreases
  4. Average Heart Rate for the route decreases
  5. V02max increases
  6. Metabolic Age (yrs) decreases
The absolute value of these readings will most likely depend on your age, gender, your level of general fitness prior to starting, your health and individual characteristics, which are often inherited.  In addition, there is often wide variation from day-to-day and controversies about the formulae used to calculate your score and its relevance to you. The message is....... Don't rely on one measurement to predict your fitness.

There are many different formulae to calculate your maximal heart rate, so if you find the popular (220 - age) doesn't work for you, then try one of the others, which are likely to be more reliable, as they are based on research, unlike the "old standard". As an example of the difficulty of interpreting individual scores, there is a general observation that fit people have a lower resting heart rate (less than 60, and even as low as 28 bpm), but there is an enormous variation between elite athletes, even in the same sport, and a very low heart rate can indicate that your heart is malfunctioning. Resting heart rates decreases with age too, at about 0.5 bpm/year.

Despite the problems with individual measurements, trends in body measurements are usually very reliable, especially if the measurement is done at the same time of the day and in the same situation each time eg on first rising  or after climbing the same hill.

If you use a heart rate monitor, trends are often plotted as graphs or can be uploaded to an associated website and viewed. Smart phone and tablet apps can record and graph your results. ( see next post).

The first three tests of your fitness (1,2,3) are easy to perform, require little equipment  and yet are very reliable indicators of fitness level. Average heart rate and VO2max (4, 5) require a heart rate monitor (HRM), while metabolic age (6) requires body composition scales. When the trend you are observing is backed up by another fitness measurement, you can be confident that the trend is real.

Additional records that many people keep, which give indirect measures of fitness trends, are:
  • Body fat % (calipers: skilled, scales: easy)
  • Waist measurement( tape measure) better than BMI
  • Body weight (scales)
  • Body Mass Index (BMI): not reliable
My next post will look at the technology needed to make these measurements; smartphone apps, heart rate monitors and body composition scales.

Related posts

Bushwalking Fitness | Stretches for bushwalkers
Bushwalking Fitness | Is stretching a waste of time?
Bushwalking Fitness | Planning a training session
Bushwalking Fitness: all posts (9)

Thursday, October 20, 2011

Bushwalking Fitness | My Bushwalk Training Music

To be able to successfully train for bushwalking using background music, you must first select music with a range of suitable BPM and then be able to vary the BPM depending on terrain. Find out how to do this, get some iPhone app recommendations and my iTunes playlist.
Firstly it is important to realise that choice of music  for bushwalking training is a very personal matter. Everyone's playlist will be different and depends on their age and musical upbringing. Mine covers pop, country, metal, R&B, reggae, but mainly rock from the 60's to the present.

While I may like the drum beat of a rock band, someone else might like the trombone of a Bavarian oom-pah band to pace themselves. For others, the regular beat of a metronome may be sufficient.

The essential selection criteria for me were:
  • enjoyable
  • distinctive beat
  • suitable range of BPM ( beats per minute) for my hilly terrain
I have published my iTunes Bushwalk Training playlist (80-140 BPM) so you can check out my choices by playing a short clip.

This playlist is for use during bushwalk training over hilly terrain, with walking speeds between 2 - 7 km/hr. Music tracks were selected because they had a distinctive beat (BPM) between 80 and 140 and because I had the songs already. They cover pop, country, metal, R&B, reggae, but mainly rock from the 60's to the present.

I used MIxMeister BPM Analyser (Mac), Beat Monitor and Cadence Run DJ (iPhone apps) to select suitable music. Remember that the first section of many tracks has a different BPM than the remainder, so the first 30 seconds may not be a good guide.

Read other related articles on bushwalking fitness.


  Creative Commons License This article by Bush Walker is licensed under a Creative Commons Attribution-NonCommercial-ShareAlike 3.0 Unported License.
Saturday, January 29, 2011

Bushwalking Navigation | Using Topo50 Maps (LINZ) for Tramping in New Zealand

Want to plan your NZ tramp using digital topographic maps? Like to view NZ Topo50 maps on your iPhone or Mac? What sorts of maps are best for tramping?  How do you select the appropriate map? How can you load and calibrate these maps on an iPhone or Mac computer? What are some of the technical problems?
New Zealanders are certainly lucky to have high quality recent produced raster digital topographic maps (300dpi) available for download for FREE , and despite some controversy, the change to NZGD2000, which is equivalent to the universally used WGS84 for bushwalking purposes, has brought some bonuses for those of us who like to use NZ maps on our iPads and iPhones. There is no doubt that for tramping a 1:50K topographic map is needed and  for steep terrain a 1:25K map is even better.

Navigation Apps

Many newer mapping programs that may not have been able to use the old NZGD1949 datum, but do have the newer WGS84 datum installed, are now able to be used by bushwalkers/trampers in NZ. Two of my favourite navigation apps,  Bit Map for the iPhone and MacGPS Pro for the Mac computer can now view and use the latest NZ Topo50 (1:50K) and Topo250 (1:250K) maps. No doubt any GPS that is able to load non-proprietary maps will be able to used these maps too.

Land Information New Zealand (LINZ)

The new Topo50 and Topo250 map series are available for download from the Land Information New Zealand website in two formats
  • geoTIFF (141 Mb for a typical map) (no map legend or margin, but includes embedded calibration data to allow automatic georeferencing and alignment of adjacent maps)
  • TIFF (214Mb) (includes the legend and margins, identical to the paper version)
Map Selection

The first step is to decide which map you wish to download and this can be done by going to the LINZ Map Index page and selecting the appropriate 1:250,000 map. Once you have selected the correct large scale map, clicking the large grid square, will reveal twenty five, 20 km x 20km 1:50,000 maps which can then be individually selected for download.

Loading Topo Maps into your Map Viewing App

Bit Map requires that you first convert the geoTIFF map image file ( no margins or legend) into a form that it can read and labels .bitmap. This can be done within your iPhone or  using a desktop application, such as those available free of charge on the developers website, which optimises the files for use prior to loading into your iPhone. The optimisation process splits the large geoTIFF image file into a large number of smaller tiled JPEG image files which have been produced at a much lower resolution to reduce loading time. This optimised format is very similar to ozf2 format, which means that if you already have files of this type from a program such as OziExplorer (not version 3), they should load without the need for any optimisation.

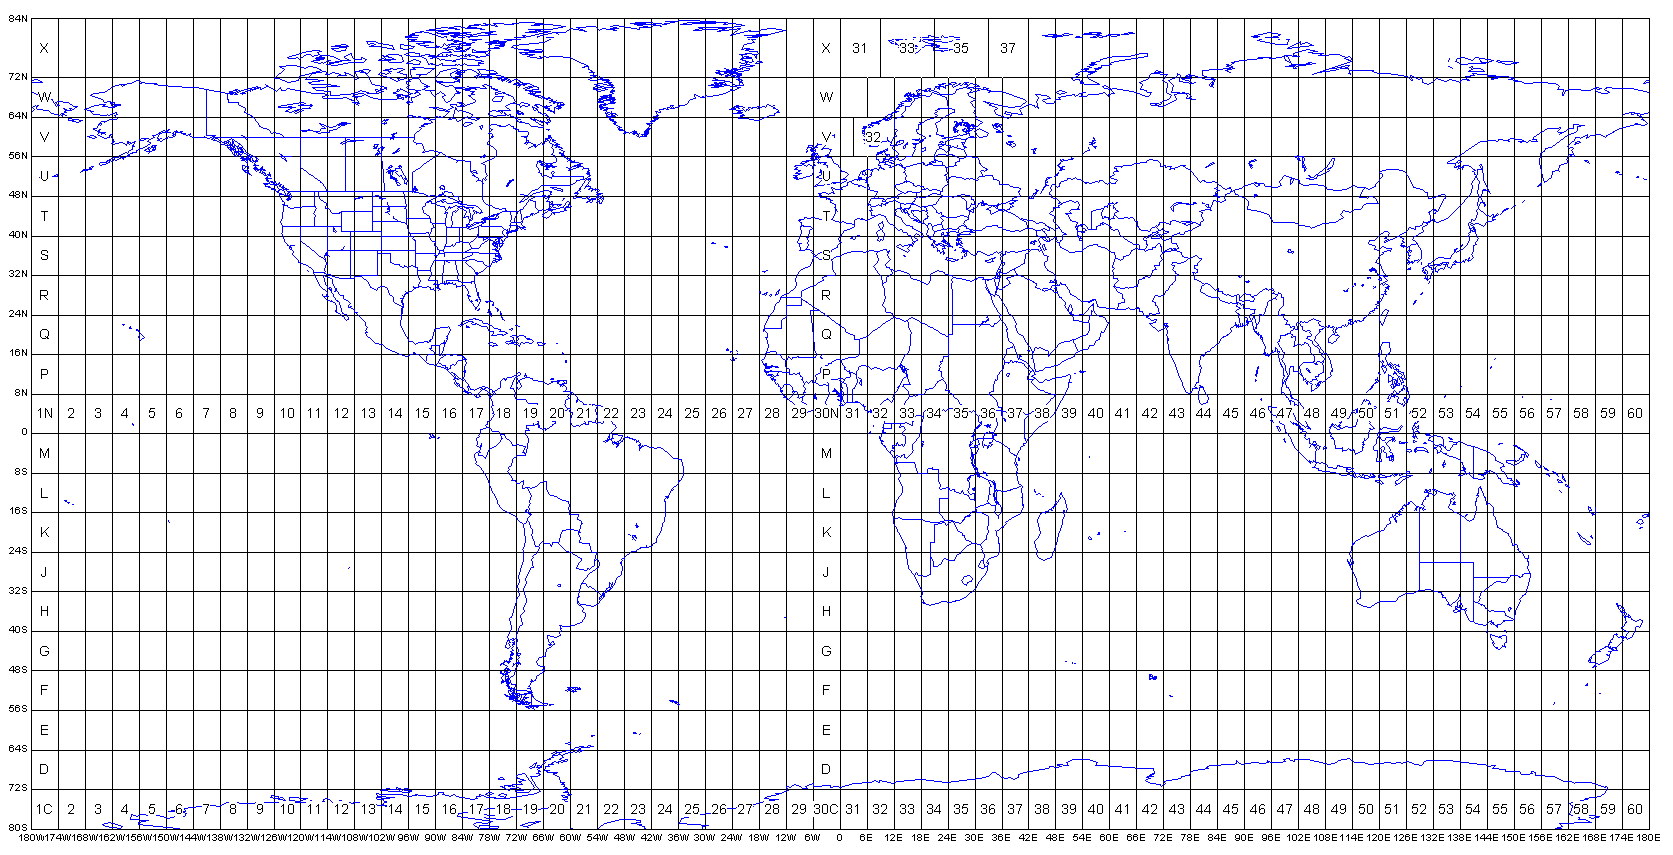
The next step is to calibrate the file, which requires a knowledge of the grid references of the corners of the map and the grid zone name. For the Routeburn track this is 59G. The grid references of the corners of the map (extents) can be found from the LINZ website, where it is possible to download the data as a text file, spreadsheet (preferred so you can change the order of the data) or view on the screen.

World UTM Grid Zones by Alan Morton

View an enlarged map
MacGPS Pro first needs to convert the geoTIFF image file into PICT format, which while no smaller, is the format used internally by the program. Once imported the file is automatically calibrated by  the user when the correct units (datum: NXZGD2000 and grid: NZTM2000, km, m, magnetic or true) are chosen and the file saved.

Check you have it right by finding the coordinates of a known point on the map and see whether they correspond to that on the TIFF or paper map

View Similar Posts


Creative Commons License
This article by Bush Walker is licensed under a Creative Commons Attribution-NonCommercial-ShareAlike 3.0 Unported License.

Thursday, January 13, 2011

Searching for Bushwalking Information on the Web | Search Engines and Social Bookmarking

How can I find information about bushwalking / tramping / hiking? Has anyone else already bookmarked suitable sources (social bookmarking)? How can I effectively search the web (internet)?
In my last post Bushwalking Trip Plan | Routeburn Track, New Zealand | Pt 1 , I set out some general questions which had to be first answered before beginning detailed planning and suggested that there were four good places to start  for this sort of general information. This post discusses generic skills, using search engines and social bookmarking, for finding information about bushwalking on the web, using the Routeburn Track in New Zealand as an exemplar.

Search Engines

Well, the easiest way is to search the internet and what better way is there to do this than using a search engine such as Google, Yahoo or Bing, the three most commonly used. The problem with this method is that the links found by these search engines may not necessarily be the best for you. For example Google ranks its links based on a complex algorithm which cannot directly take into account the accuracy of the information or the relevance to you personally. Its rankings are based upon keywords, recency, frequency of updates, quality and number of links to and from the site, number of visitors and other criteria which are secret.

All three of these search engines allow an option to only search pages for Australia. This might seem a sensible way to filter the number of links found  for a search of the Flinders Ranges in South Australia or Otway Ranges in Victoria, but in fact this is not a good idea. Some of my best sources of information have been blogs by overseas visitors. Obviously for a search about the Routeburn track in NZ, this would not be wise either.

Google Alerts

Rather than continuously search the Web for new information, set up a Google Alert which will send an email to you as it happens, once a day , or once a week , with links to all the articles on the web that have appeared on the topic of your choice.

To do so, you will first need a free Google account, which will also provide you with a free Google Mail account and access to the whole range of valuable free Google products eg Blogger, Docs, and Website. If you set up a Google Mail account first, you can use this new email address as the contact point for all your other Google products and therefore an added level of privacy and security.

Social Bookmarking

To make it more likely that you will find relevant bookmarks,  check one of the free social bookmarking websites such as Delicious.

Delicious is a web 2.0 social bookmaking site which allows the public to search for information, based on the tags (keywords) which have been assigned to the URLs (web addresses) by Delicious members who have bookmarked them. As the site is the work of many people with an interest in your topic, the number of people who have bookmarked a site is a good indication of the potential value of the site and provides an alternative and, I would argue, better idea of ranking than that provided by a search engine.  Those who have bookmarked a site will be bushwalkers/trampers/hikers like you, with similar needs and interests.

Although these will be public pages, you will  be able to select just the bookmarks I (username=oz.bushwalkingskills) have made or those of other bushwalkers you value, by adding us to your Delicious Network, but to do this you need first to become a free Delicious member. Fortunately you don't need to wait for me to add my URls, as others have already added their "Routeburn" bookmarks to the public pages. By searching Delicious, you will be able to see who has contributed each bookmark on the Routeburn track and add significant  contributors to your subscribe list filter or to your network.

Searching Delicious for the tags "Routeburn Track" brings up 62 public results (as of 13/1/2011) in the Everybody's (public) category. It also shows the other tags which have been used for a particular URL, so you can add these and filter the results if you wish. Interestingly it gives a graphical time scale showing when the bookmarks were added and for the Routeburn the most URLs added was in March 2008.

If you want, you can subscribe to all URLs with the tag "Routeburn" which will aggregate all URLs on the web with the tag "Routeburn" and bring them to your subscriptions page as they are added. Additionally you can subscribe to only the Routeburn tags by a particular user eg oz.bushwalkingskills, if you wish to narrow down the list. To do this however, you will need to join Delicious which is free.

To find out more about Delicious:
Creative Commons License
This article by Bush Walker is licensed under a Creative Commons Attribution-NonCommercial-ShareAlike 3.0 Unported License.

Tuesday, December 21, 2010

Bushwalking Rescue: Emergency Evacuation by Helicopter

Have you ever needed a helicopter rescue? Ever raised the alarm using your (personal locator beacon) PLB or marine EPIRB? What can you do to make the landing or winching site safer? How can you attract attention and give signals to a circling aircraft? What information do you need to provide?
Well I'm fortunate and have never needed a helicopter rescue, neither has anyone in any of my groups. Nor have I ever had to raise the alarm using my PLB (personal locator beacon) or EPIRB, but I have walked in lots of areas in Tasmania where this is a regular occurrence, either due to poor weather, bushfire or injury.

On occasions, I have seen a helicopter circling and wondered whether someone is in trouble. On one occasion I was approached on a track by Parks and Wildlife staff who had been in radio contact with a rescue helicopter which had been circling and were trying to locate a person who had set off an EPIRB (emergency beacon) and then left the spot, tuning off their beacon when they left.

On most of my walks into isolated areas I have taken an EPIRB ( no longer licensed), now replaced by a PLB. Walking in the Gammon Ranges and further north I have taken a VHF radio for communication with nearby homesteads. Along the south coast and south west coast of Tasmania,  I have taken a marine radio for communication with passing fishing boats. Of course I always have my signalling mirror and mobile phone with me!

Alerting Rescue Services

Modern technology has provided us with several devices
NB Tasmanian Parks and Wildlife has PLBs for hire
    Alert Detection
    "Radio distress beacons operate on 406 MHz with a 121.5 MHz transmission feature being used for final stage homing.
    NOTE: After 1 Feb 2010, old analogue EPIRBs and PLBs operating on 121.5 MHz are no longer licenced for use.
    The technology of distress beacons is so advanced that the location of the boat, aircraft or individual in distress can be calculated to a search area of as little as 110m with a digital 406 MHz beacon, if encoded with GPS.
    A digital 406 MHz beacon can relay much more information than simply the distress location.  When registered properly with AMSA, 406 MHz distress beacon can provide the RCC Australia with information such as the registration details of the aircraft, vessel or vehicle as well as emergency contact names and contact numbers.   This may allow further information to be gathered relating to the type of craft, survival gear carried and the number of people on board etc.  REGISTRATION IS FREE.
    After defining the search area, aircraft or other rescue craft rely on homing equipment to locate the beacon's exact position.
    It is important that once a beacon is switched on in a distress situation you should not switch it off until rescue has been affected or you are advised to by the rescue authority.Australian Marine Safety Authority
      Traditional methods include
      • lighting signal fires: three fires in a triangle for an emergency.  Have green vegetation handy to create smoke.
      • signaling with a mirror:  lightweight signaling mirrors with a hole in the middle to assist location are cheap
      • laying out markers and recognised symbols
      Ground to Air Signals
      • V require assistance
      • X require medical assistance
      • SOS: repetition of 3 signals, separated by a minute
      The following universal signals  are for strip signals, recommended to be built from rocks or tree branches or dug in the ground and are designed to be seen from the air. Make your signal big ( 6 -10m  by 1 m, with at least 3 m between symbols) so that it can be seen from a distance, and select a highly visible location.

      Wilderness Survival Forum

      N - No, Negative
      Y,  or A - Yes, Affirmative
      A square - require map and compass
      Preparing the landing area
      • Chopper can only descend vertically 15 metres
      • Select landing spot with clear approach and exit into the wind, clear 25m diam landing spot with a further 5m no more than 60 cm high, no more than 10% slope.
      • Mark landing area with a large H
      • Streamers or smoke to mark wind direction
      • Clear the landing spot of loose debris. Eye protection should be worn.
      • Approach helicopter from front & lower side on slope only when signaled.
      Abandoning Camp

      If you have to abandon camp, leave clear direction markers to show where you have gone and continue to mark the track, so you know if you have doubled back.

      References

      Creative Commons License
      This article by Bush Walker is licensed under a Creative Commons Attribution-NonCommercial-ShareAlike 3.0 Unported License.

      Wednesday, December 1, 2010

      Plan Safer Bushwalks: Weather Forecasts and Climate Records

      Why check the weather forecast before you go bushwalking? How should you use the weather forecast and climate records to help pack and plan your hike?  How can climate records help you?  How can you check the weather during your walk?
      Trip Planning

      An essential component of trip planning is to check the climate statistics for the region you will be visiting and for the time of the year. This can be a critical component of your planning because there are enormous variations in the weather both within and between States. I usually look at both last years and average statistics for the month I am intending to visit. Finding the nearest weather station often takes a bit of hunting.

      You should check out the climate statistics before you go, so that you take the right clothing, food, water and tent and can allow extra days for extreme weather. The stats will give the likelihood of this happening.
      For those of you planning a trip to the Tasmanian Central Highlands, you will need to expect lots of rain and some snow even in summer. A winter trip will require special expertise and equipment, which will beyond the expertise of most hikers.

      Check the statistics for Scott Peak Dam, just north of Western Arthurs and near Mt Anne . Long term stats show February would be the best time to go if you wanted the least number of rain days. But what clothing should you take?
      Daily records for February show: Max temp 35, minimum temp 3, highest rain 42 mm. Long term averages show: 15 raindays, mean max temp  21, mean min temp 9, mean rain 65 mm
      I'd be taking a full range of gear: sun hat, sunburn cream, long shirt and maybe long lightweight trousers for the hot days then overpants, rain jacket, perhaps down vest, thermals for the cold.

      If you are planning a trip to northern SA (eg the Gammons) in spring check the forecast carefully as the temperature is often in the high twenties or low thirties, when it is high teens in Adelaide. My experience is that it is often 5 -10 degrees warmer than Adelaide but colder at night. 

      Check the climate statistics for Arkarooola the nearest weather station.
      Long term averages show May to August look best from a temperature perspective (19-20 deg C). Mean min temp are 3-7 deg C, (lightweight sleeping bag weather). Days of rain 3, mean rain 6-10 mm (you may even risk just a fly depending on the month)
      Further north in the Gammons, water can also be short supply after six months with little rain. A spring/summer trip is a no, no! Surprisingly, most rain falls in December-March as the tail ends of monsoons sweep down SE from the Kimberley, so May will still have lots of water in rock holes.

      Read more on Trip Planning
      Taking Enough Water

      The weather stats are useful because you can check rainfall for the current and previous few months. You should be able to work out whether rock holes will be full, creeks flowing and surface water available. In Tasmania in summer in certain locations eg Mt Anne, Frenchmans Cap, you can often rely upon deep "yabbie" holes which will usually contain water even when the surface is dry, and can be drained  with a short piece of tubing.

      Expected temperature has a significant bearing on how much water you will need to carry. On a warm day, carrying a full pack I need about 4 L during the day, add to that a dry overnight camp and breakfast and 6 litres becomes the minimum to carry between "wet" campsites. You should hydrate before you leave your source of water each day, to reduce the amount you need to carry. Have a couple of extra cups of tea , even drink your teeth cleaning water if you are short.

      Spare days
      If you are walking in alpine areas, areas subject to flash flooding or in places which are exposed to weather blowing in from the sea, for example the central highlands of Tasmania or the west coast of the South Island in NZ, allowing extra days to sit out a storm or wait for a river to fall ( Franklin or South Coast Track, Tasmania) is essential for safety.


      Risk Avoidance and Response
      Most bushwalks require some risk analysis  during the route planning stage and this should automatically involve a check of the weather and climate statistics for the locality.

      The Adventure Activity Standards (AAS) specifies two units from the Outdoor Recreation Industry Training Package which are helpful
      Bushfire Alert
      Many Parks close and evacuate walkers when there is an imminent threat of bushfire or on days of high bushfire danger. While  most of us try to avoid walking in the middle of summer, those of us who walk in Tasmania by choice, have to expect the occasional park closure. A little commonsense helps too... check for Park closures before going, don't walk towards smoke and always have an alternative escape route in case you are cut off by a bushfire.

      The Victorian Outdoor Recreation Centre's Newsletter has some excellent advice. A great resource is their Guidance Note Management of Outdoor Activities for Severe Weather Conditions (November 2009) which is available for download.

      Check for bushfire alerts:
      Try the iPhone apps

      FiresAU . For those of you who live in NSW, Tasmania, SA.
      This app lists bushfire alerts ranking them according to proximity to your location, using the built-in GPS. Bushfires are also shown on a map by red pins and your current location by a blue pin. In the case of an emergency, a "canned message" can be emailed to a contact giving your location.
      Fires Near Me NSW
      This is the official iPhone application of the NSW Rural Fire Service. This application provides information on current incidents across NSW attended by the RFS and other agencies. It also provides information on total fire bans.
      Lightning Warnings
      Thunderstorms can be dangerous if your caught on an exposed ridge or under a tree while its raining. One way to avoid being caught is to try to work out how far the storm is away, using the lightning flash and the time taken for the thunder to be heard.

      One iPhone app that does just this is Thunderstorm-Calculator

      Tides
      Knowing the predicted tides can be invaluable for those bushwalks where you will be walking along the coast. Two walks come to mind: The Great Ocean Walk along the coast near the Otway Ranges in Victoria and the South Coast Track in Tasmania. Both of these walks require decisions to be made about whether it is safe to walk along the shoreline or whether an inland route should be taken. ...and these are decisions not to be taken lightly as both coasts are subject to big waves and strong southerly winds.

      There are several iPhone apps which give tide information and in some cases store it on your smartphone so you don't need internet access to view the data:

      Moonlight
      Well, there have been a few occasions when I would have liked some moonlight to complete a long walk, but most of us like to be in camp by mid-afternoon. If you are an aspiring alpine mountain climber, then moonlight becomes more important, as you often need to make a start in the early hours of the morning to catch the snow while it is hard.

      Check out the iPhone Moonlight app.
      Moonlight features a photorealistic display. The program takes the observer's  current position and time into account for exact rendering of images. Moonlight not only displays a pretty 3D image but also shows various essential data points: moon phase, distance between earth and moon, julian date or local sideral time.
      Monitoring the weather while you walk.
      There are many ways to monitor the weather while you walk
      1. wristwatch
      2. portable weather station
      3. smartphone app
      4. GPS with inbuilt barometer/altimeter
        1. Wristwatch Weather

        Suunto Observer
        I have only used Suunto watches (Finland), bought from Paddy Pallin, which have been around for many years and are very reliable. Their only problem is that the batteries have a significantly shortened lifetime if the compass, backlight or GPS are used frequently and having them replaced by Suunto is NOT cheap. Be careful if you have it done at your local jeweller, even if they claim to pressure test. Like me, you may regret it when your very expensive watch fills with water, as mine did after a swim in Lake Vera, near Frenchmans Cap, Tasmania after I had the battery replaced by the local Battery Bar

        They make a great everyday watch and a good bushwalking navigation backup. PS The alarm  is very quiet for me. Must be old age!

        2. Portable Weather Station

        Light weight, compact, weather stations which can be carried in your pack have become available recently at a low cost. I can't vouch for their accuracy, but I would imagine they would be at least as accurate as a wristwatch.Many have an LCD screen so you can watch trends.

        Try Dick Smiths for some ideas. They are much cheaper than a wristwatch "weather station" and there is no need to leave your tent in the morning to check if its raining!

        .... or Kathmandu, for their combined weather station, alarm and clock at sale prices.

        3. Got an iPhone? then try an app

        iBarometer:
        Lets you easily know what is the pressure near you, using the internet. Great for calibrating your altimeter. Contrary to standard applications (with predefined cities), this version of the barometer will give you precisely the pressure of where you are. It integrates its own conversion system.Could be very useful before set out on a walk.
        Pocket-weather-au 

        Pocket Weather AU
        Highly recommended, Australian developers; the one I use!

            Forecast and observation data for hundreds of areas around Australia. Select it via GPS, Map or list.
            - Push current temp, text forecasts and state,regional and local warnings to your iPhone
            - Custom interface for browsing BOM warnings, all nicely formatted for your iPhone
            - Tide graphs for hundreds of locations around Australia
            - National Rain, Satellite and Synoptic Chart
            - Animated weather icons
            - Sunrise/sunset times
            - All of the BOM rain and wind doppler radars with Find/Track me function as well as the ability to have it auto update (see 'Live Radar' in settings)
            - National rain and cloud radars and Synoptic chart
            - Extended forecasts for regional areas
            - Give your locations custom names
            - Shake to refresh, simply shake your phone to refresh the data
            - Realtime UV support for some locations
            - Last update is always cached, so you don't need a network connection to check the weather for the week, once you've got it once.
            - Updates are tiny (less than 10kb) so you don't have to worry about your iPhone data cap.
            - Supports landscape and portrait view, and in landscape you get all the information on a single page. 


            - 7 day forecasts for more than 250 official forecast locations
            - Detailed local observations, typically updated every 10 mins
            - Each forecast location includes up to 6 nearest official observation locations, accessible by side-scrolling action.
            - 50 rain radar locations around Australia
            - The radar view also has a "Locate Me" feature which queries the iPhone's GPS and then centres the radar map on your current location along with an animated cross hair cursor.
            - Radar data delivery has been carefully optimised to arrive quickly on your iPhone  (Free version available)

         It uses GPS to show your location on the radar inf ull screen landscape view. National cloud and synoptic charts.
        Time and Australian Weather, a match made in heaven. Weather sourced directly from the Australian Bureau of Meteorology (BOM) displayed elegantly alongside the current time. 
        Calculate wind chill temperature by simply selecting the air temperature and wind speed. The calculated wind chill temperature is displayed "on the fly". For those who travel by bike, motorcycle, boat, or other means where you find yourself exposed to the elements while in motion, Wooly Wind Chill now has the option to calculate the approximate effective wind chill based your current moving speed (not factoring for actual wind speeds).

           This app brings back the ancient knowledge of former generations:
        Identify conclusively a thundercloud and what kind of weather can be expected in what time frame when you see fleecy clouds.  Find out if  it is going to rain when the spider stops spinning its web and much, much more.  Detailed descriptions of all cloud types and the weather they bring. Complete cloud atlas with all cloud families, species and types according to the  International Cloud Atlas of the WMO (World Meteorological Organization). Large photo gallery with over 70 examples of all cloud types
          4. GPS with Barometer

          Garmin GPS
          Garmin, and no doubt others, have quite a few GPSs which come equipped with a barometer/altimeter eg  the wrist mounted Foretrex 401, the touch screen Oregon 450 -550 series, GPSMAP 62 series, eTrex Summit HC, eTrex Vista

          Get more iPhone  Apps for the Outdoors

          Some Great Uses of the iPhone for Bushwalkers Forums

          Check out some Forums


          Folk Lore

          Creative Commons License
          This article by Bush Walker is licensed under a Creative Commons Attribution-NonCommercial-ShareAlike 3.0 Unported License.

          Sunday, November 21, 2010

          How to Best Upload and Share Your Bushwalking and Hiking Photos

          Where should I store my photos taken with my iPhone or digital camera? What is the best app to use to share them with my friends? Which app offers the best value?  Should I get a paid account or will the free version be sufficient? How do popular apps Flickr, SmugMug and Picasa compare?
          I have spent some time reviewing the options for uploading photos for viewing and have made a summary below.  Storage of photos is best done on a DVD or a removable hard drive; your hard drive is only for the short term.
          Alternatives: How to sync, share, and publish with third-party tools
          "...., a free Flickr account lets you upload 100MB of media per month (with unlimited total storage); a $25-per-year Pro account gives you unlimited photo and video uploads, as well as numerous other features. Smugmug presents your photos more stylishly than Flickr; accounts with unlimited storage start at $40 per year. "
          PICASA

          iPhone apps:
          Web Albums - A Picasa Photo Viewer, Uploader and  Manager By Scott Sykora
          iPicasso -Picasa web albums
          Want Picasa on your desktop?
          Picasa 3.8 Mac (beta)
          Picasa Web Albums Uploader for Mac
          Picasa vs iPhoto
          Comparison Picasa 3.5.1
          Want both? Then you can import photos from iPhoto into Picasa using RSS feed and then upload to the web.

          Better Ways to Share
          • Create online albums to share pictures by email without large attachments.    
          • Print with ease, print pictures at home or online
          • One click lets you copy your pictures to a memory card so you can display them on your digital frame.
          • Make a video with your digital camera and then upload to YouTube™ with just one click.
          • Upload directly to Facebook™ with a few simple clicks.
          • Upload top Flickr
          Compare Flickr with Picasa

          My summary below has beeen compiled from several excellent blogs on this topic.

          Picasa vs Flickr : Ultimate giants of photo sharing, which service is better for you?
          by Rahul on June 23, 2009
          Photo faceoff: Flickr vs. Picasa ( a little dated)
          16 August, 2007 by Chris 
          5 Reasons Flickr Runs Circles Around Picasa
          by Adria Richards 14 September 2009
          Flickr, Picasa and SmugMug Shootout
          Jarel Remick on March 25th 2010

          Both Flickr and Picasa have tagging, search and social networking so you can share with friends and see what they have uploaded, although Flickr has more options. Both provide RSS feeds so you can track what your friends are doing. Flickr allows RSS feeds based on tags

          Account
          • Flickr requires a Yahoo account. The free account has adverts.There is a Pro paid account. Free vs paid Flickr account
          • Picasa requires a Google account, and integrates with other Google apps
          Developer tools
          • Lots of APIs for Flickr. None for Picasa
          Storage
          • Picasa gives you 6Gb for $20/yr. Any storage purchased is shared amongst your other Google accounts
          • Flickr gives you more (limited without the pro version) for $25/yr
          Ease of upload
          • Optimised settings
          • Flickr limits bandwidth per month (100Mb)  while Picasa limits storage
          • Flickr 200 photos max most recently uploaded for free users. Don't get deleted just hidden until you delete some. Flickr: No limit. Upload infinite photos and videos. But there is limit of total 100MB of photos and 2 videos every month.
          • Picasa: A free user can create up to 250 albums, total 500 photos and videos per album, i.e. total 1,25,000 photos.
          • Upload from mobile: Picasa easier than Flickr
          Size limits
          Free User
          • Picasa Photo: 20MB and 50 Megapixel Video : 1GB Total Capacity : 1GB
          • Flickr: Photo : 10MB Video : 150MB Total Capacity: 100MB/month  

            Paid users

          • PIcasa Photo: 20MB and 50Megapixel Video : 1GB Very expensive beyond the 80Gb/$20 per year 
          • Flickr Photo : 20MB Video : 500MB Total Capacity : Unlimited. Much better for professional photographers Total Capacity : Options of 20GB, 80GB, 200GB, 400GB, 1TB, 2TB, 4TB, 8TB and 16TB.
          • Google storage can be upgraded at any time so you can start with the minimum 20Gb at $5 p/year and upgrade as you need it.
          • Paid version of Flickr is without ads.
          Search
          • Flickr: by location, keywords or tags, and then most relevant or most interesting.
          SEO
          "Flickr allows it’s images to be indexed by Google, Google Images and Yahoo which extends the reach of your photos well beyond the Flickr.com website. All you need to do is properly tag and describe your photos for them to grow wings. You can include URL links in the description as well and I do that often to link my screenshots back to blog posts I write." (Adria's blog)
          Community/ Social networking
          Flickr better. Photo pools. Unmatched social networking till now. Very easy to comment on other's photos and add as a contact. There are several groups and discussions going on. Lots of people comment and discuss each other's photos. This social networking aspect is one of the biggest and major attractions of Flickr which Picasa will find it very tough to beat.
          Video formats
          • Picasa 3GP, AVI, ASF, MOV, WMV, MPG, MP4, M2T, MMV, M2TS
          • Flickr AVI, WMV, MOV, MPEG (1, 2 and 4), 3GP
          Web presence
          • Much better exposure to public on Flickr
          Display
          • Picasa : unlimited albums, but no sub-albums
          • Flickr : 3 sets plus photostream of up to 200 photos
          • Both have Slideshow
          Desktop
          • Picasa  has an excellent utility to organise and edit photos prior to upload. 
          • It automatically gathers all media files on the hard disk and provides easy navigation for the user. Just a click of the 'Upload' button will upload hundreds of photos to the Picasa Web Albums. 
          • Other options available are 'Blog This!', ‘Print’, ‘Email’, 'Movie' and 'Collage' maker. 
          Other features
          • Edit tags, captions, titles. Include EXIF data including gps location for both
          • Slideshow yes for both
          • Abbreviate URL link for emailing. Flickr better
          • Subscribe to comments
          • Favourites
          • Publish to blog (Picasa) through desktop software, Flickr within web app
          Licensing
           "Flickr makes it easy to “share” your photos and give people the right to use your photos in a way where you get credit for the images and they can use them on their websites. This is known as Creative Commons. There are several types of CC licensing and you can read to find out which option fits you. I usually choose, “Attribution with non-commercial” (Adria's blog)
          Privacy

          Picasa:
          • Public
          • Unlisted (send album link, no sign in required)
          • Private (by invitation) 
          • Post to only friends without need for an account.  Picasa integrates with other Google apps such as Gmail
          Flickr: 
          • Public (visible to everyone) Visible to friends (visible to people whom you add as friends, viewers need to be signed in and added to your contacts as friends before hand, a disadvantage)
          • Visible to family (visible to people whom you add as family, viewers need to be signed in and added to your contacts as family before hand, a disadvantage)
          • Private (only visible to you)
          While Travelling
          • Remember that if you wish to upload your full size photos while on holiday that is an entirely different scenario
          • Uploading full size photos is very slow from a hotel room
          • Buy some extra storage cards for your camera or burn them to DVD at an internet cafe, by inserting your card ( lock it first) directly into the desktop.
          • Once you have uploaded you may not be able to get the full size photos back.

          Any other ideas? Please comment.

          Creative Commons License
          This article by Bush Walker is licensed under a Creative Commons Attribution-NonCommercial-ShareAlike 3.0 Unported License.

          Friday, November 19, 2010

          Using your Smartphone to Monitor Fitness Levels for Bushwalkers and Hikers

          Do I need to train for bushwalking? What is the best way to train for bushwalking? What should my goals be and how do they vary with increasing age? How can I motivate and monitor my fitness program?
          As your age creeps up a structured training program becomes more important because your fitness level falls away rapidly after a short break from walking and takes longer to re-establish. Younger walkers can maintain their fitness between serious bushwalks with minimum effort, but as you get older, walkers must fit exercise into their daily routine.

          Daily fitness activities are essential, not only so you won't get left behind on a walk, but also because exercise and diet are keys to keeping the good HDL high and the triglycerides low, both essential for lowering the risk of heart disease. I find the best type of exercise is that which closely replicates the terrain you will be walking. If you are going to be carrying a heavy pack, do so in your training;  if you are going to be hill climbing, do so ; if you are going to be climbing down steep slippery slopes, do so.

          I don't find that gym work is entirely effective as it doesn't work the same muscles. Sure, it will improve your aerobic fitness, but will it train the muscles that need to support your legs under a heavy pack as you move down a steep slope?

          Motivation and accurate monitoring are keys to improving your fitness level. I need to know whether I have improved each day, has my speed increased, did I get to the midpoint sooner than yesterday, am I fitter now than this time last year?

          Fortunately technology, which allows you to compare times on walks, is available

          There are three main monitoring devices, all of which do a similar job :
          POLAR wristwatches with heart rate monitor strap: upload to you computer or watch
          Nike  shoe sensors (iPod, iPhone): senses movement and upload to you upload to iPod, iPhone from where it can be uploaded to a dedicated website for analysis

          The  advantage of these systems is that you can upload your data from each walk to a website for analysis and share it with others, even view it real time. Some products have exercise programs in-built from which you can choose.

          I have extensively used two smartphone programs:

          Sports Tracker (free Nokia app)

          This free program has allowed me to keep track of my daily exercise program by allowing me to compare times, look at split times and I have even used it to record day walks, using the inbuilt GPS, and uploading geotagged photos taken along the trip with my Nokia phone. Certain models allow you to link with a heart rate monitor and record heart rate at the same time. The major problem I find is that the new version doesn't allow me to group walks by route, which means that I am unable to compare times over the same route. This means that it no longer meets my needs and I have moved on to the iPhone app Walkmeter below.

          Walkmeter (iPhone app $5.99)

          This program does most of what Sports Tracker does but does something that Sports Tracker doesn't do and that id compare walking routes.  I particularly like its ability to monitor progress and give audio  feedback along your walk eg how far you are ahead of your median time or behind your best. This means you don't need to take your smartphone out of your pocket at all when its raining. Just like the Sports Tracker, it multi-tasks allowing you to listen to your favourite music as you walk.  See your results on maps, graphs, and a calendar, and organized by routes and activities. Summarize your statistics by day, week, month, year, and overall. It does not incorporate photos like Sportstracker, but I rarely take photos on a training walk.

          iSports Tracker (iPhone app $5.99)

          iSportsTracker for iPhone 3G, 3GS and iPhone 4 enables you to track outdoor sport activities like running, biking, walking, hiking, skiing, skating and more. iSportsTracker tracks your speed or pace, distance and calories burned, draws your track on a map, takes photos, uploads your tracks and photos to various online services like RunSaturday, MapMyTracks, EveryTrail, Picasa Web Albums, can send training data by email in GPX, KML or CSV formats and even can post a Tweet! (Free version available)

          If you are really keen there are iPhone apps (pedometers) that allow you to determine your paces per minute  and choose appropriate music with the same beats per minute (BPM)

          Wristwatches

          These use blue tooth to link with a heart rate monitor. They perform sophisticated calculations to make sure that you are exercising in the correct heart rate zone and have inbuilt programs from which you can choose. The results can be uploaded to a website for analysis in the newer models. Unless you prefer the small screen of a wristwatch, then the smart phone ( eg Nokia) with heart rate monitor is the way to go. The Polar brand of wristwatch is the market leader and has been around for a long time.
          Creative Commons License
          This article by Bush Walker is licensed under a Creative Commons Attribution-NonCommercial-ShareAlike 3.0 Unported License.

          Friday, November 12, 2010

          How to Keep your iPhone Charged in the Outdoors

          The iPhone has a reputation for using up batteries fast, but the new iPhone 4 seems to have an improved battery life, despite its ability to "multi-task". You must however be extremely careful though that power draining apps such as wi-fi, bluetooth, and the GPS are not working continuously. Turn it off in the bush when you are not using it!

          Despite all of this, there is little doubt that the iPhone will not last more than 6 hours with heavy use eg if using the GPS  or compass continuously. This of course is not long enough for an overnight hike, let alone a 5 day backpacking trip.

          There are some obvious ways to keep a smartphone charged:
          • replace the batteries when they are flat
          • trickle charge with a solar panel
          • USB connection to computer
          • connect to an AC power supply
          • connect to an external battery pack
          Well, the batteries of the iPhone are not replaceable, so that only leaves four alternatives.

          I have just bought a PowerMonkey eXplorer, which offers all four options. It is available online from Paddy Pallin's store at a bargain price for members. (PS I have been a member for more years than I can remember but I don't stand to gain from this recommendation.)

          PowerMonkey eXplorer (PowerTraveller)
          There are alternatives to the PowerMonkey eXplorer (PowerTraveller) but none that I am aware of offers all 4 options.
          • Rechargeable Battery pack:  Energizer AP1201
          • Solar Charger only: try Powertraveller website below
          • Universal AC charger with adapters: comes with the iPhone too
          • USB connector: comes with the iPhone too
          Why did I choose the PowerMonkey eXplorer?
          • Good quality for the price, rugged body and water resistant
          • Works with other battery operated devices such as cameras, phones, iPods, PDAs
          • Versatile: battery pack, solar charger which can hang from your pack or tent, AC power adapters for most overseas countries
          • Comprehensive range of adapters to suit most devices
          • Consistently good reviews on the web going back several years
          • Capacity to give 3 full charges for your iPhone in ideal conditions
          If you haven't seen the need for additional battery for your iPhone check out some of these articles:
          Read a current review or visit the manufacturer/s website

          Powertraveller Powermonkey eXplorer Review from FitTechnica
          Powertraveller website

          NB This product has been around since at least January 2008 and has undergone several improvements since its release. Be careful in placing too much faith in early reviews as there have been improvements.

          View other related iPhone posts
          Creative Commons License
          This article by Bush Walker is licensed under a Creative Commons Attribution-NonCommercial-ShareAlike 3.0 Unported License.

          Tuesday, November 9, 2010

          My Favourite iPhones Apps for Bushwalking, Hiking, the Outdoors and Fitness.

          For about three weeks, I have been trialling a selection of free and paid iPhone apps, small applications for mobile phones, of which a small number may eventually meet my needs as a keen bushwalker (hiker), photographer and "naturalist".I have been overwhelmed by the variety of apps, their quality,  versatility and value. With a 32GB iPhone, I have plenty of room to experiment!

          The key to versatility is the ability of iPhone 4 apps to integrate and multi-task in the background with the inbuilt compass, GPS, accelerometer and gyrometer, camera, video and music player. The high resolution touch screen makes many tasks such as map reading easier.

          Some of these apps duplicate functions included in others, but offer them in a more user friendly manner or with more options. Be wary of free apps that include ads that will drive you mad with their insistence that you visit their website or depend for full functionality upon registering for  a website which then owns and shares your information and habits with third parties. Many of the free apps are "lite" versions of the full paid version and are made available so you can test the features before purchase.

          In a previous post, I did a Google search and came up with a list of over 60 "outdoors" apps  which I then reduced to a smaller number for download especially those with a local flavour. I have intentionally omitted those that require registration on a website to work and those that can't use the UTM coordinate system, where this is critical. I have included "Lite" versions which allow you to trial the product free of charge before upgrading to the full paid version if you wish.

          Over the next few weeks, I will review some of the best in more detail. Those that I have downloaded so far include the following :

          Navigation
          Gone Trekking Safety Outdoors: location aware safety notification app (Free version available)
          MotionX GPS : attempts to bring many of the features of a dedicated handheld GPS, plus a sports and  fitness GPS, plus a geotagging camera into a single app (Free version available)
          Map Overlay Tracer: overlay and trace maps directly on top of Google maps
          Google Earth: explore your intended or current  location using 3D satellite imagery (free)
          GeoLog Tag: acts as a GPS data logger and geotagging app (JPEG and RAW) for photos taken with any digital camera. (Free version available)
          Declination: find your current magnetic declination based on the World magnetic mode. (Free)
          Bit Map: offline map viewer for your own imported topographic  maps in standard image formats plus oz2 (Australian)
          Map Tools: utility that lets users fully utilize coordinates. Converts between datums, including AGD66, AGD84,GDA94, NZGD49, coordinate systems, and map projections and calculates distances.
          Convert Units; ideal for converting F to C, miles to km, quarts to litre, or with custom unit conversions km/hr to minutes per mile (Free)
          Pocket Pedometer: specifically designed for walkers and runners, automatic movement detection, calibration, distance measure, calorie counter, conversion system. (Free version available)
          Orienteering Compass : behaves just like an oil-bath compass with outer locking ring
          BackToMyCar
          : assures you of never forgetting where you parked again, take photo, turn by turn walking instructions, see distance and time left on meter. (Free)
          Service Tools
          No Signal: No cell service? In a dead zone? want to be notified when you can make calls again without taking the phone out of your pocket?
          Photography
          Photonasis has the biggest collection of photo effects on the app store  (Free)
          Genius Scan: turns your iPhone into a pocket scanner, great for sending those trip intention forms you have just completed (Free) 
          Photo Timer : capture group photos and self portraits
          Flickit: keep your Flickr.com photostream up to date
          Flickr: shoot, upload and share photos and videos: Geo-tag your photos or add them to a set. View your photos by set and tagBurst Mode: analyse fast events frame by frame eg bird flying
          Remotomatic: make your iPhone a bluetooth remote controlled camera with self-timer shutter built-in.
          Equipment
          Camp and Hike: allows selection from a larger master list depending on duration, weather and type of trip.
          ListPro : the ultimate list making toolkit (Free)
          Reference
          Australian. Birds (Michael Morcombe eGuide): a comprehensive collection of bird calls, sketches and a searchable, location aware database, which allows side by side comparisons.
          Bird in hand; covers 23 of Tasmania’s common and endemic birds and includes bird calls, high quality pictures and information on their habitat, breeding, diet etc. Use the App while out bush to work out which call is which.
          Star-Guide: displays the constellation to which your iPhone is pointing (Free)
          Wikipanion: accessing Wikipedia has never been faster and easier eg do a search for Federation Peak, Tasmania and find out the history, location, climate, climbing routes and get photos.
          Fitness
          iWorkout Lite: Do you want a personal trainer in your pocket? metronome, pedometer, exercises, videos
          Walkmeter: continually records your time, location, distance, elevation, and speed. See your results on maps, graphs, and a calendar, and organized by routes and activities. Monitor your progress with up to 20 configurable announcements including distance, time, speed, elevation, climb. Compete against your previous workouts along a route.
          Pocket Pedometer (Free) measures distance, time, calories, steps with automatic calibration for walker. Battery saver turns off screen automatically.
          First Aid/Emergency
          Gone Trekking Safety Outdoors:  location aware safety notification app
          MediProfiles: carry all the emergency medical information you need about your co-walkers in case you need it in a remote location. Published by St John Ambulance (Free)
          TuneIn Radio: listen to and record over 40,000 radio stations via the internet including thousands of AM/FM local stations. Want the local weather forecast or fire danger report?
          Utilities
          Flashlight: the LED light on iPhone 4 and fills your screen with bright white light . Strobe for emergencies. Red light for night use.
          KnotsGuidecontains 92 knots divided into 10 categories
          Learning the Ropes- Navy Knots learn to tie navy knots with 3D animation and notes (Free)
          GoodReader
          : use it to view reference documents you have saved from the web. Super-robust PDF reader with advanced reading, annotating, markup and highlighting capabilities, excellent file manager, TXT file reader and editor, audio/video player, Safari-like viewer for MS Office and iWorks files.
          Kindle
          : gives users the ability to read Kindle books
          Library : keep track of and share bushwalking books you have read, books you want to read, and books you are reading. (Free)
          BooksApp Lite: easily catalog your entire book library, group related books together, recommend your favorite books to your friends and family and keep track of who has borrowed your books. Uses ISBN and scans barcode to import details including artwork. (Free. Limited)
          Climbing Grade Converter : converts grades between 14 climbing grade systems including bouldering (Lite version is free but limited)
          Weather
          iBarometer: lets you easily know what is the pressure near you, using the internet. Great for calibrating your altimeter.
          Pocket Weather AU: weather sourced directly from the Australian Bureau of Meteorology (BOM) Keep up to date with weather alerts and extended forecasts.

          Creative Commons License
          This article by Bush Walker is licensed under a Creative Commons Attribution-NonCommercial-ShareAlike 3.0 Unported License.