Showing posts with label equipment. Show all posts

Wednesday, January 15, 2014

Bushwalking Equipment | Can I Really Do Without a Smartphone?

As a bushwalker, can you afford not to own a smartphone? Which smartphone apps can replace dedicated equipment? What are the limitations?

Over the last few years technology has made smartphones invaluable to bushwalkers, replacing many of the devices, which previously had to be bought and carried individually.

Probably the first device carried by bushwalkers to be incorporated into the iPhone was the still and movie camera. Today's smartphone has a high quality camera which can take video and stills, including panoramas, mark each with the location at which the photo was taken, and then upload it to the web using wifi or mobile (cellular) data.

Next, the GPS became available, allowing routes to be mapped live, waypoints determined and marked, and distances accurately determined. Recently, apps which allow the viewing of calibrated digital maps have become commonly available, and some apps now incorporate the navigation features found in a dedicated GPS. High resolution colour screens make viewing these maps and navigational features easy. Modern smartphones have built-in compasses which can be calibrated and are accurate enough for the day walker, but not accurate enough for bearings over long distances.

Then high quality heart rate sensors came on the market which could pair with a smartphone, initially using a "dongle" plugged into the earphone socket but more recently using low energy interference-free Bluetooth.
 Some apps even use the smartphone camera and built-in light to measure blood flow pulses in a finger, without the need for an independent sensor. Fitness training had become more scientific!

The next advance was the ability to measure heart rate variability (HRV) (see previous post), using the powerful analysis capabilities of modern smartphones. Initially measuring HRV was only possible with expensive laboratory based equipment, but soon Polar had incorporated this ability into some of their top-of-the-line wrist computers. In the last few years, this technology has migrated to the smart phone, allowing bushwalk training to be fine tuned.

Bush walkers visiting remote areas often feel the need to take emergency devices with them to obtain help if an emergency occurs. We are all familiar with personal location beacons (PLBs) which can transmit a message, including location, to an overhead satellite, and from there to emergency rescue services.


SPOT gen3 s can send a message via satellite to your emergency contacts or to the same rescue service. Version three is much better functionally according to the reviews, but has a more expensive subscription.

Recently smartphone apps (GetHomeSafe) have become available which can send an SMS or email, if a bushwalker fails to return on time, without the need for any action by the "injured" or "lost" person or instantly in a critical emergency to a contact list or even rescue services directly, including the current location, participant details and a route plan. "You don’t need a working phone (be within range) or even to be be conscious for an alert to be sent."

Bush walkers on day walks and within range of a mobile tower, up to 70 km from a high enough vantage point, can add weather and tide apps  and the ability to visualise routes or places in 3D using Google Earth.

We now have GPS, fitness, navigation, mapping, emergency notification and weather services available at low cost in the one device! The only problem is a lack of battery capacity, but even this can be overcome to some extent with a solar charger.
What is next?
How do you overcome these limitations?
Where will the future take us?

  Creative Commons License This article by Bush Walker is licensed under a Creative Commons Attribution-NonCommercial-ShareAlike 3.0 Unported License.

Tuesday, January 14, 2014

Bushwalking Fitness | Pt 2. Using a Heart Rate Monitor and a Smartphone to Measure Fitness Variables

Knowledge of which heart rate variables can help you to plan your training? Can a heart rate monitor help you decide whether you are over-training? How do you know if you are getting fitter? How can measuring heart rate variability (HRV) help you decide?
Disclaimer:  I am not a trained sports medicine professional, and therefore the advice given here needs to be checked with your doctor or fitness professional before application. Values vary enormously from person-to-person and depend on your health, age, gender and fitness level. Sometimes a value which would be excellent for a very fit person can indicate a heart malfunction for someone who has a sedentary lifestyle.
As mentioned in the previous post, there are now a number of low cost, high quality smartphone (both Apple and Android) apps which allow you to very accurately measure, and store, many of the heart rate variables of interest to bushwalkers and other athletes.

Aerobic Capacity (VO2 max)

This is one of the most reliable measures of your cardiovascular fitness, and measures your body's aerobic capacity ie  ability to take up and use oxygen.

Some smartphone apps such as Polar Beat and many of the Polar wrist computers with OwnIndex®  can estimate this with 86-93% accuracy by measuring your heart rate (255 beats) over 3-5 minutes, when you are lying flat at rest.  The watch takes into account your resting heart rate and HR variability, along with body weight, height, and activity level. Care is needed in taking measurements in a consistent manner, usually as early in the morning as possible, before any activity, to allow day-to-day comparisons.

The improvement you may observe in as little as 4 weeks of aerobic training, is more important than the absolute value, and tells you whether your training program has been successful. I have used an F11 Polar wrist heart rate monitor for many years, and find that measurements taken every week give a very reliable indicator of my fitness trend.

You can download a copy of the Polar OwnIndex® chart,  which gives you an indication of your level of fitness, based on age and gender.

More...

Heart Rate Variability (HRV)

Overtraining is a major worry for those who train hard and often, as it may take many months to years to recover. Fortunately, overtraining can be predicted (controversial) by some high quality heart rate monitors and appropriate apps, which are able to sense small variations in resting heart rate and heart rate variability, the variation in the time difference between peaks,  from day to day. In general, HRV decreases with overtraining and resting heart rate increases.

These apps (see previous post)  can measure your HRV, in a few minutes prior to each day's training, and advise whether you need a rest day for recovery, or whether you are making real progress. They are sensitive enough to be able to detect an approaching illness, changes in stress level, over-training and even variation in diet, if coupled with a high quality heart rate sensor (eg BlueTooth Polar H7); far more reliable and sensitive than the Tanita body composition scales I had been using until now to measure fitness trends.

These apps are widely used by athletes and professional sports people and have a lot of sports science research to back up their reliability claims. In the few days, since I have been measuring HRV, I have found these apps  easy and quick to use and that they produce results consistent with my subjective assessment.

While trends on their own are useful, they are much more valuable if the trends can be correlated with changes in activity, diet, stress, training load etc. and several of these apps allow this "environmental" data to be logged simultaneously. Other apps such as Precision Pulse, allow training load to be calculated objectively, using the TRIMP method. Without an accurate measurement of your training load, a meaningful assessment of the trend is difficult.

More....

Maximum Heart Rate (HRmax)

 If you are using a heart rate monitor to adjust your training load then you need to know your maximum heart rate (HRmax), as it is essential measurement to determine your training zones. This can be estimated by a formula, but the actual value (as measured by a heart rate stress test) will vary in the range ± 20 bpm for most people.

Many smartphone apps use one of these formulae to calculate your HRmax, but usually offer the opportunity to enter a user value, if you have had it measured accurately.

During my training sessions of about 4 km, which include a 200m climb and a similar descent, my maximum heart rate reaches an average of about 82% of my HRmax (162 for myself) and my average heart rate is about 63% of HRmax.

More...

Resting Heart Rate (HRrest)

This is usually measured after 15-20 minutes of lying down, before your day starts. If you are using a HRM, wait until it stabilises. The value depends upon fitness, stress, diet and health status, which varies on a daily basis. Very low HRrest may indicate a heart abnormality in someone who is not an athlete.

 As you get fitter your resting heart rate should get lower. My average HRrest is 44, but varies daily  between 40 and 49. An increase of more than few beats can indicate that your are over-training, but there are many other possible explanations, hence this measurement on its own has limited value.

Heart Recovery Rate (HRrec)

Heart rate recovery, a measure of the drop in heart rate when you stop exercising, is considered an excellent measure of fitness, with a more rapid drop indicating a higher level of fitness. After 30 minutes, your heart rate should have returned to its pre-exercise value, and if greater than 120 after 5 minutes, you have probably pushed yourself too hard. Walking slowly (cool down) for 5 minutes after stopping exercise is advised to increase recovery and reduce heart stress.

An alternative method involves taking your pulse during exercise and then again 1 minute after cessation. Divide the difference by 10 to get the Recovery Rate Number.
  • Outstanding greater than 6
  • Excellent 4-6
  • Good 3-4
  • Fair 2-3
  • Poor less than 2
You should consult a doctor if it is 1.2 or lower, as there is a potential heart risk.

The recovery rate is independent of age, but is linked to fitness and heart mortality.

More....

Orthostatic Heart Rate (OHR)

Your heart rate increases when you stand, and this increase is usually in the range 15-20 bpm. If it is greater than this you have probably not recovered from training the previous day, are under stress or have an illness approaching.  This can be used as a rough guide to your fitness, as the lower this figure, the fitter your heart.

Measurements should be made after 15 minutes resting in a supine position (HRrest) and then again 15 seconds after standing, or alternatively just take the maximum reached after standing.

Alternatively, the difference between the your resting HR and standing HR  can be recorded over a few weeks and the average used as a guide to decide the meaning of each day's measurement and how to vary your training. My average difference (OHR) is 14 but varies widely between 6 and 31 depending on whether I have over-reached or have an illness approaching.

More...

Heart Rate Training Zones

There are many apps and web sites that allow you to calculate your heart rate zones, if you know your resting pulse and maximum heart rate. If you don't already know this, you can allow the app to estimate it from your age. Polar have a free app Polar Beat which can monitor your training while it is actually happening and store the results, but I prefer to use Walkmeter, as it gives excellent voice (Australian) feedback during the walk and  can be controlled with the remote.

Typically 60-70% of HRmax is your fat burning and recovery zone, 70-80% is your aerobic zone, 80-90% is your anaerobic zone, and 90-100% is reserved for interval training. Depending on your reasons for training, it is important to keep within the correct zones, otherwise all your efforts can be wasted

One of the main limitations of this method is that heart rate varies depending on dehydration (+ 7.5%), heat and humidity (+10 bpm), altitude (+10-20%) and natural biological variation (± 2-4 bpm). BrianMac

More...

Related Posts

Bushwalking Fitness | Pt 1 Smart Phone Apps to Fine Tune your Bushwalk Training  
Bushwalking Fitness | Pt 3 My Choice of Smartphone Apps for Fitness Training
Other Fitness Posts

Some more references

Bushwalking Fitness (14)
Training with iThlete
Maximum Heart Rate (BrianMAC)
Heat Rate Training Zones (BrianMAC)
More about the Polar Fitness Test 
Heart rate training limitations 
What Makes a Difference in Heart Rate Recovery Time After a Workout?
How Long After Working Out Does Your Heart Rate Return to Base?


  Creative Commons License This article by Bush Walker is licensed under a Creative Commons Attribution-NonCommercial-ShareAlike 3.0 Unported License.

Monday, January 13, 2014

Bushwalking Fitness | Pt 1 Smart Phone Apps to Fine Tune your Bushwalk Training

Have you ever wondered whether you're actually getting fitter for bushwalking? Are you over-training? Should you skip a training session due to illness or stress? Would a heart rate monitor (HRM) help? Can a smartphone replace a wrist HRM? Which smartphone apps are available to help?
Most of us judge whether we are getting fitter by subjectively assessing our level of tiredness/soreness/shortness of breadth after a strenuous walk or by trying objectively to beat our PB (personal best) on a fixed route. We may even use a smartphone app such as Walkmeter, Polar Beat, or Precision Pulse to record our training sessions, and hopefully progress.

Polar Beat


 We may think that spending more time training and climbing steeper slopes (ie increasing volume and intensity) will help, but that is not always so. Sometimes we can over-train which will be detrimental to our performance, sometimes setting back our progress for months. There are affordable smartphone apps than can help prevent over-training. (eg HRV4training, iThlete, bioForce HRV)


iThlete

Heart rate monitors have recently become affordable, with iPhone and Android apps costing only a few dollars now, replacing expensive wrist watches worth hundreds of dollars. All your need is a smart phone with a camera, and with some persistence, and a lot of trial and error, you may not even need a chest belt with heart rate sensor. (NB: some user comments, supported by my own experience, suggest that this method is often inaccurate, so I would recommend using a Bluetooth HR sensor such as the Polar H7.)


Heart rate monitors are able to measure a wide variety of heart variables that are very useful indicators of your fitness:
  • heart rate variability (HRV); time variation between your heart beats
  • resting heart rate  (HRrest): your minimum heart rate, when lying down, at rest
  • heart rate recovery (HRrec): the number of beats  your heart rate drops in a minute after reaching a peak, following intense exercise.
  • heart rate orthostatic (HRortho): measures the difference between HRrest and the maximum rate achieved on standing (or after 15 seconds)
  • aerobic capacity (VO2max): can be estimated by doing a Polar "fitness test"
The measuring of these variables was once solely in the domain of exercise physiologist using equipment worth many thousands of dollars, but then in 1983 Polar developed a chest strap with heart rate sensor (transmitter) and wrist receiver.  Heart rate monitoring (HRM) became relatively affordable for most athletes, with the cost dropping to a few hundred dollars.

In the last few years, with the development of the iPhone 4S or 5, which both have Bluetooth, wrist worn receivers are no longer necessary, with the smartphone taking over this job. iPhone apps able to perform as well as equipment once worth thousands of dollars, now cost less that $10 with some even free. Equivalent Android apps are coming on the market at a rapid rate. Chest sensors to monitor heart rate cost less than $100.

We have all seen professional athletes wearing heart rate and GPS transmitters, during sports. The science is well developed and much of this knowledge is now applicable to bushwalking.

The next post (Bushwalking Fitness | Pt 2. Using a Heart Rate Monitor and a Smartphone to Measure Fitness Variables ) in this series looks in more detail at the important fitness variables which can be measured by a smartphone and heart rate sensor and how they might be used to fine tune your training.

The final post Bushwalking Fitness | Pt 3 My Choice of Smartphone Apps for Fitness Training answers the questions:

Which apps should I choose to monitor my fitness? How should they be integrated? How should I fine tune my training, using the data collected?

  Creative Commons License This article by Bush Walker is licensed under a Creative Commons Attribution-NonCommercial-ShareAlike 3.0 Unported License.

Friday, September 28, 2012

Bushwalking Equipment | Boiling Water on a Wood Fire

Want to quickly boil water on an open wood fire? Tried a traditional Stockman's Quart Pot yet?
History

Boiling water on an open fire is a tradition that is fast disappearing as "Stoves Only" signs become more common in our parks and campgrounds. While the opportunity remains, why not try a traditional method that has been around for well over a 100 years and was used by the cavalry in the Boer War and by our early drovers and stock men?

Traditional tin
Modern stainless steel
On my last few bushwalks to the Flinders Ranges, I have used one of these traditional pots and found it to be excellent. I have listed some advantages and disadvantages to help you decide.

Advantages
  • Steeped in history
  • No wire bail (handle): fold away handles make it easier to pack
  • Fast boil, as it can be placed directly in the coals
  • Dual purpose, as it includes a cup, which also acts as a firmly fitting lid to keep out ash
  • Space saving, with matches, gripper, tea bags, sugar inside
  • High efficiency, as flames surround the pot without any possibility of melting the handles
  • Easy to hold, as wire handles cool quickly
  • Maintains shape and packs easily, due to strength and oval shape
  • Easy to remove from fire with a stick placed through the wire loop on the lid and wire loops on main container (not shown)
  • Large size (1.1L): large drink (500ml) and water for freeze dried pack (400ml)
Disadvantages
  • Weight: heavier than titanium
  • Cools rapidly, compared to a plastic mug
  • Rusts, if you don't dry before packing, unless you buy the stainless steel version
  • Dangers: don't let it boil dry or the solder will melt on tin versions (stainless steel versions available)
  • Health Risk: traditional tin version has lead solder
Alternatives

There are a variety of titanium kettles available but they either lack the bail to lift from a fire, have no integrated cup or have plastic coated handles. They are also much easier to damage while packing.

Some Links

Bushcraftoz 

Related posts

Campfire or stove?

What do you use in your campfire?

  Creative Commons License This article by Bush Walker is licensed under a Creative Commons Attribution-NonCommercial-ShareAlike 3.0 Unported License.

Friday, September 7, 2012

Bushwalking Boots | Preventing Blisters in Poorly Fitting Boots

Ever found that perfectly good boots are giving you blisters? Too expensive to throw away? Discover some solutions to this problem.
Leather boots often take ages to break-in. Some brands of expensive leather boots, with a full thickness hide, can take months, before they feel comfortable.

Some  solutions I have tried include:
  • wearing multiple socks to increase the padding ( eg two thick or one thin inner and one thick outer)
  • wearing the boots for a few months, for short durations, until your feet toughen
  • soaking the boots in a bucket of water, and then wearing them until they dry
  • preemptive bandaging of your feet, before beginning your walk
Blister location


The outline sketch on the left shows where I usually got blisters after an extended pack-carrying walk, with my old leather boots. HINT: To help you remember where the blisters occur, make a sketch by standing on a sheet of paper, immediately after your walk
If you have a similar blister pattern, it may be related to where the toe of your boot bends, just below the lower end of the tongue, which often produces a ridge, which can rub on the top of your toes, causing blisters. Try stretching the boot to get rid of the ridge (see below)


Stretch boots
  • add extra padding to your boots eg inner soles (gel are best but expensive and have a shorter life)
  • stretch the boots, by soaking thoroughly and then jamming something like a bottle or log of wood inside the boot and waiting for it to dry.


Don't forget that:
  • your feet are often different  sizes, and that this can vary depending on the temperature of your feet. Don't be surprised if you need two socks on one foot and three on the other.
  • leather doesn't like intense heat. It will crack, if placed too close to a fire. 

Related post

Bushwalking Boots |Selection and Fitting Criteria

  Creative Commons License This article by Bush Walker is licensed under a Creative Commons Attribution-NonCommercial-ShareAlike 3.0 Unported License.

Friday, December 30, 2011

Bushwalking Equipment | Keep Your Camera Working in the Cold and Wet

Ever tried to take photos in the rain on a cold day or come inside from the cold to a nice warm hut/car/tent and wondered why you couldn't see through the lens? Worried about what will happen when you go outside into the cold and wet?
These are universal problems for outdoors photographers and can be incredibly frustrating, as I recently experienced on the Routeburn Track in New Zealand.

Fortunately the cold itself is not usually a problem for a warm camera ( NB the same applies to your smart phone's inbuilt camera), as condensation does not form on warm objects and cold air is usually relatively dry. There are of course the dual problems of the rain or snow falling on the lens or getting into the camera electronics and then there are the  batteries, which often fail when cold. No batteries, no photos!

Solving the battery problem is relatively easy. Just keep the camera warm, next to your body, along with a spare set of batteries which you can use to replace the non-functioning cold batteries if needed. Swap them back with the newly warmed batteries, if you need to repeat the process. While they are much more expensive, Lithium batteries last longer and perform better in the cold than NiCad.

The difficulty of shooting photos in the cold and wet is that you often get water on the lens or viewfinder, which either makes it difficult to compose the shot or ruins it completely. Pull your rain jacket hood over your head and use a  peaked cap to keep the water off the lens and camera. Keep the camera inside your jacket near your body, where it's easy to find, not inside your cold backpack, where both the camera and the pack contents will get wet every time you want to take a photo.

The alternative of course, is not to take the camera out of you pack during rain, but then why bring your camera at all, if you're not going to use it. Wet weather photos are unique and mountain scenery with rain and snow falling, cascading waterfalls, racing creeks and swirling fog is magical.

If it's particularly cold and you are wearing gloves, then you have another problem. Take your gloves off and freeze while you operate the buttons or use a camera that is fully automatic. Even better, buy a waterproof fully automatic camera or a single use waterproof camera.

Coming inside after a long day in the cold is the most problematic. The greater the temperature difference between your camera and the warm moist air produced by all those wet clothes drying in front of the fire, the greater will be the condensation on your lens and electronics. The solution of course is to minimise the temperature difference by either pre-warming your camera or slowly letting it warm in the coldest place you can find inside.

Placing your camera in a waterproof bag before you come inside, will make sure that any condensation is on the outside of the bag not on your camera. Then its just a matter of waiting until your camera warms up before you take it out of its bag.

The same applies to your camera card and batteries, let them warm up next to your body before changing them in your camera.

Acknowlegement

Thanks to Bill S from Trailspace and the New York Institute of Photography for the inspiration to write this article. I needed reminding that condensation only occurs on cold surfaces.

Read more
Related posts
How to Use Your Camera in Cold Weather (RitzCamera.com)
Cold Weather Photography (Trailspace)


  Creative Commons License This article by Bush Walker is licensed under a Creative Commons Attribution-NonCommercial-ShareAlike 3.0 Unported License.

Thursday, December 29, 2011

iPhone App Review | Tide Prediction

Have you ever wanted to a walk safely along a beach, across a tidal estuary or around a rocky headland? Well of course you could check the BOM website from home before you left, but what if you had forgotten and only had your iPhone with you?
Sometimes knowing when high tide is going to be can be critical to planning a safe bushwalk. There are many locations where part of the walk will be along a beach, around a headland or across a tidal estuary. Often the guide book will warn that if the tide is high you must take and alternative inland route or even camp and wait for the next low tide. Being caught on an exposed headland as the tide advances is not much fun.

In Australia, I have used this information to safely plan walks along the Great Ocean Walk in South West Victoria and along the South Coast Track in Tasmania.

The following list of iPhone apps includes one that is actually a weather app which includes tides as one of its features.

AU Tides Pro
AU Tides Pro Screenshot
Contains downloaded database for 2010-2012, which means you don't need to be connected to the internet
World Tides 2012
Contain downloaded database for 2012 only, which means you will need to buy a new version at the end of 2012. This app only allows access to tide predictions 6 days ahead. World Tides uses the Simply Harmonic Formula and harmonic constants provided by the UKHO to give 7 day tide predictions without the need for an internet connection. Features: Moon/Sun Rise/Set times, large slidable tide graph, recent locations, built in zoomable map, gps sensor, search, and details page. 
Pocket Weather AU
Pocket Weather screen shot
I have used this as my weather app for over a year and don't see the need for an additional tide app. It does need internet access which makes it useless in remote areas, unlike the other three which actually download the tide database. Weather is sourced directly from the Australian Bureau of Meteorology (BOM) - an Australian Source for Australian Weather! #1 Weather Application in Australia, Best Australian App winner, Staff Pick in iTunes Store many times -
Shralp Tide (FREE)
Shralp Tide Screenshot
No network connection is required, so you can check anytime, anywhere. ShralpTide displays the current tide along with the high and low tides for the current day and the next 4 days. Includes an INTERACTIVE FULLSCREEN TIDE GRAPH in landscape mode. Turn the device on its side then touch the screen to see the tide at any time in the 24 hour window. Shralp Tide does not include all of the tide stations in the world. It has good coverage of the US and Canadian coasts as well as Australia, New Zealand and Japan. Beyond that there is spotty coverage of international locations.
The benefit of an iPhone tide app is that the calculations are done automatically for you if you select one of the non-standard ports. Of course, your iPhone probably has a GPS, in which case the app will work out what is the appropriate location on which to predict your tides.

You can of course use the Bureau of Meteorology's tide predictions available on their website, which are based on a series of "standard ports" around Australia. In Tasmania, Hobart is one of the five standard and one secondary ports with calculated tide predictions available. Time differences for a limited number of other secondary ports are provided so you can work approximate tide times yourself by adding or subtracting the time difference.( see map below)
From BOM
I don't know the technical side but my iPhone app Shralp Tide gives the following for Wednesday 28 December for the first high tide.
  • Maatsuyker Island (south of the bottom of Tasmania) high tide at 1.31 am as 0.69m
  • Hobart: high tide at 12.34 am of 1.05m
  • Bramble Cove : HIgh 3.17 am 0.78m
Bathurst Harbour is not listed nor Port Davey; you must use Bramble Cove.

BOM Tasmania gives Hobart as the nearest standard port and lists tides at secondary "ports" as a time difference from Hobart

Hobart HIGH at 1:02 AM 1:07m
  • Maatsuyker Island +0:25 H:M
  • Bramble Cove, near Port Davey is -0:48 H:M
  • Hobart 0:0
Using these differences the iPhone app gives a pretty close estimate except for Bramble Cove which seems to be way out!

PS Don't forget to allow for daylight saving if not done automatically by the app.


  Creative Commons License This article by Bush Walker is licensed under a Creative Commons Attribution-NonCommercial-ShareAlike 3.0 Unported License.

Wednesday, December 7, 2011

Bushwalking Equipment | The Ideal Camp / Hut Shoes

There is nothing like stepping out of you hiking boots at the end of a long day into something more comfortable. Need to go outside in the middle of the night? What are the alternatives?
I've just come back from a few weeks in NZ, and during this time decided that, despite what others might think of me, the time was right to buy a pair of  Crocs.
Crocs Yukon Sport
NZ huts require that you remove your boots before entry and either leave them at the entrance or in the drying area. In the middle of the night, "the call of nature" may require a 25m walk through the bush; hardly something you can do in your socks, and without waking the whole hut, putting on your heavy wet boots is not an option.

What should you look for in the ideal hut/camp shoe?
  • comfortable
  • lightweight
  • compact
  • non-slip sole
  • adaptable for emergency use
  • waterproof
  • drain easily
  • quick drying
  • reasonably thick sole
  • long wearing
  • stop on your feet
I want to be able to wear my camp shoes on the trail,  cross rocky creeks in them if needed, AND use them in the hut or around my tent.

What are the options?  

Thongs/flip-flops, Crocs, neoprene or fleece booties, thick socks, Dunlop Volleys, Vibram FiveFingers shoes.... I've seen them all and each has their supporters. Unfortunately, none of these will satisfy all your needs and so each becomes a compromise, decided by personal preference and your environment.

Dunlop OC Volleys
I have used neoprene boots in the past. These are lightweight, compact but have thin soles which make them unsuitable for rocky ground and they don't dry or drain easily.

Fleece boots are great in a hut; warm, lightweight, reasonably compact, but unsuitable for outside use.

Thongs are compact, lightweight, cheap but lack grip and slip easily off your feet.

Volleys have their ardent supporters and meet most of the criteria, but are reasonably heavy, get dirty easily and don't dry quickly; not really what you want in a hut.


Vibram FiveFingers (VFFs) are new on the scene, lack a thick sole or heel and imitate barefoot walking, which is something that most of us don't often do. Take care, they use muscles and parts of your foot that you have probably neglected. They are not the sort of shoes you can put on and walk for kilometres without previous experience.

Crocs meet almost all criteria, except they are a little bulky!


  Creative Commons License This article by Bush Walker is licensed under a Creative Commons Attribution-NonCommercial-ShareAlike 3.0 Unported License.

Tuesday, December 6, 2011

Bushwalking Equipment | Do closed cell foam sleeping mats absorb water?

You've probably heard comments that closed cell sleeping mats don't absorb water, but is it true?
Intuitively, most people don't trust the sales talk that closed cell foam pads don't absorb water.

Thermarest Z Lite
On any track you will see that most people carry their closed cell pad in a plastic bag, strapped to the outside of their packs. If it has rained heavily, you will see them drying their mat in front of the fire.

Well what do the gear review websites say? Anything from they don't absorb water at all, to they absorb very little. What is the truth? Well this depends on the quality of the mat you have and how much contact the mat has had with water.

My closed cell foam mat absorbed about 17- 25% of its weight in water, depending upon how I exposed it to the water. Deep submersion along with squeezing absorbed more than a superficial sprinkling from the garden hose

My advice would be to keep your mat inside your pack, where it will not be exposed directly to water, perhaps even using it as a pack liner.

  Creative Commons License This article by Bush Walker is licensed under a Creative Commons Attribution-NonCommercial-ShareAlike 3.0 Unported License.

Monday, December 5, 2011

Tramping the Routeburn Track in New Zealand

Tramping (bushwalking, trekking, hiking for non-NZanders) the Routeburn Track recently showed me how variable the weather in the South Island can be....sunny one moment, foggy and raining the next, with snow falling a few hundred metres above the tree line. What fantastic scenery!
I've just come back (mid-November) from tramping the Routeburn Track over three days starting from the Routeburn Shelter and finishing at The Divide, with overnight stops at Routeburn Falls Hut and Lake Mackenzie Hut.

While not a difficult walk,  full wet weather gear and winter clothing is essential for safety reasons, even in summer. Waterproof boots make the days much more comfortable.

This was a most enjoyable walk despite the fact that it rained for most of the time, as the alpine scenery was awe-inspiring with the mists swirling into the valleys, the snow capped mountains towering hundred of metres above and thousands of waterfalls, which are often non-existent in drier months. Sometimes the sun would break through the clouds revealing the majestic scenery and the glacial valleys with their braided rivers. It's no wonder that the South Island is the location for the Hobbit and Lord of the Rings movies.

I did not regret having booked a bed in the huts through DOC, as enjoying the camaraderie of fellow walkers, often from distant parts of the world, along with the evening talks by the hut wardens were highlights. In wet weather, there is nothing like a warm fire to dry out your clothes, and a comfortable mattress at night, without the sound of roaring winds and pelting rain. Of course, there are disadvantages, such as a lack of privacy and the disruption to sleep by snorers and those getting up in the night to go outside.

The DOC huts (pdf brochure download) offer a touch of convenience and comfort not available to those who pitch a tent.

November is at the beginning of the walking season and as such the risk of avalanche is often present to the extent that the track is either closed or helicopter transfers necessary to avoid the danger. This proved to be true in our case, with a heli-shuttle operating past the overhanging snow cliffs from Lake Harris to the Harris Saddle shelter, ......at our cost of course!

I never cease to be amazed by those who attempt such walks without even a waterproof jacket and sand shoes, which offer no protection against the freezing cold rivulets crossing the track. No wonder people have died from hypothermia on this track before!

Some more closely related posts: Routeburn Track (8)

  Creative Commons License This article by Bush Walker is licensed under a Creative Commons Attribution-NonCommercial-ShareAlike 3.0 Unported License.

Thursday, June 30, 2011

Bushwalking in a Mouse Plague

Ever wondered how you need to protect your equipment when camping during a mouse plague? Is there anything you can do to avoid attracting them?
Having recently (April) walked in the Vulkathunha-Gammons Ranges in the north of South Australia, I was surprised to find how adaptable the house mouse is to an arid environment. Of course,  it had been one of the better seasons on record, and water was laying in small rock pools which normally would not have existed.

Sitting around our campfire we were amazed to see twenty or so mice approach within a few metres, looking for leftovers. On retiring, we soon realised how much noise a few mice can make as they run over your tent, gnaw at your tent and pack, and pick through your scraps. There is nothing quite like a gnawing sound to keep you awake, as you wonder which expensive piece of your equipment is being destroyed.

On rising, many of us noticed damage to our gear; holes in our packs and tents, even those that had been placed off the ground. Those who had been game enough to sleep with only a tent fly or in a bivvy sac had horror stories to tell.

While mice don't conjure up the same element of fear, methods of protection from mice have some similarities to those needed when walking in bear country.

Safeguarding your Gear

The key to protecting your gear is to securely isolate your food from your gear or if you can't do that make the food undetectable to smell.

This means adopting a combination of the following:
  • keeping your food, including leftovers, in airtight bags
  • not leaving food scraps around to attract them
  • keeping the food outside your tent and pack
  • isolating your pack from the ground, by suspending it between two trees on a very thin rope
  • making the rope unclimbable by making it long and thin (heavy nylon fishing line)
  • placing spinning obstacles on the cord such as drinking straws or soft drink bottles
  •  use your billy to store your food and put a rock on top
Some observations are that mice :
  • can climb trees
  • can eat through plastic containers, canvas, rip-stop nylon
  • can run along ropes
  • love to eat foam mats, and the handles of your walking poles.

  Creative Commons License This article by Bush Walker is licensed under a Creative Commons Attribution-NonCommercial-ShareAlike 3.0 Unported License.

F824UW3BW46W

Thursday, June 16, 2011

Bushwalking Equipment | Which Type of Walking Pole is Best?

Should my poles be adjustable in length? Which material should they be made from? Do my poles need shock absorbers? Are the new ultra-light, foldable poles worth the extra expense?
While I don't have much experience with poles other than my collapsible  poles which have shock absorbers, I hope to summarise some of the discussion I have read.

Adjustable?

Adjustable poles are a definite bonus as they need to be lengthened for downhill and shortened for uphill. There is however a downside and that is the additional  weight and the remote possibility that they could collapse. Fixed length poles overcome this problem by having a longer hand grip so you can move your hand up and down to suit the slope, but I suspect this is a less than satisfactory solution due to the difficulty of adjusting the wrist strap and the inability to place your palm over the end of the pole when descending to give additional support. They usually come in several sizes.

Material?

Most poles are made of high tensile aluminium, not unlike tent poles. Graphite versions are available, and for those  that wish to go ultra-light, they are an obvious but more expensive choice, weighing less than 300 g.

Shock absorbers?

I am not sure about their value over difficult terrain, but they could be effective on hard surfaces at high speed. For some applications such as crevasse crossing they are a disadvantage as they don't allow the same ability to measure resistance on snow bridges. There seems to be a fair bit of consensus that shock absorbers are just another thing to go wrong, and if they do, difficult to repair in the field.

Foldable?

www.wildearth.com.au
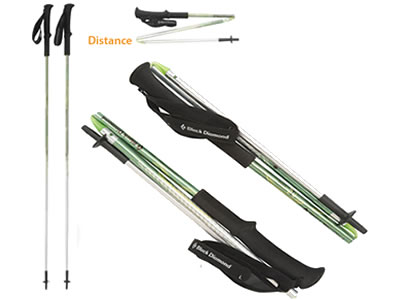
I like the idea of being able to stow my poles inside my pack, next to my tent poles. Having them on the outside is an invitation for them to get caught during shipping and for the attachment points to get ripped from your pack. Field tests show foldable poles to be very reliable, fast to assemble and lock together firmly. Usually they have three sections and join together like tent poles or an avalanche probe. When folded they are not quite as compact as the collapsible, telescopic type, but are shorter and lighter.

Well know brands include Black Diamond and Leki and they usually come in three or four sizes. If you need a pole as an integral part of your ultra-light tent you will need to select length carefully. They are however "chokable" ie the handle section collapses/expands a little to allow for the different lengths needed for ascent or descent.

Other features to check before purchase.

Are the rubber and metal tips easily interchangeable?
Are the wrist straps comfortable?
Are the baskets a suitable size for use in mud or snow?

See also

Bushwalking Equipment | Are Walking Poles Useful for Bushwalkers? 

  Creative Commons License This article by Bush Walker is licensed under a Creative Commons Attribution-NonCommercial-ShareAlike 3.0 Unported License.

F824UW3BW46W

Bushwalking Equipment | Are Walking Poles Useful for Bushwalkers?

Do walking poles "save" your knees? How many poles do you need? How does the use of walking poles vary with terrain? Which type of pole is best for bushwalkers? Do poles need to be adjustable in length?
I am a convert! 

Having just come back from a 3 day walk  in the Flinders Ranges (Chace & Druid Ranges) there is no doubt in my mind that walking poles prevent injuries and assist to take some of the stress from your knees. This was the first time I had used walking poles off track in a rugged arid environment with scree slopes, thick bush, rocky outcrops, rocky river beds and bush 4WD tracks and they came out winners in each situation.

How could anyone not want to use walking poles I ask? Well perhaps my own situation can add some insight. 25 years walking in a variety of environments throughout SA, VIC, TAS and NZ and never once used walking poles on an expedition.

Why not?
Walking poles are heavy. They get in the way when you are walking. They are likely to break. They cost too much. Just another piece of useless technology. Only those past their prime need them.
 These are some of the arguments you hear when walking poles are being discussed by the unconverted and I have to admit that I have used some of them in the past. 

Well my conversion wasn't instantaneous. I found myself using two poles on the wet grassy slopes of the Mitcham foothills during my training walks. Previous experience had shown me that descending steep muddy slopes covered in wet grass was a catastrophe-in-waiting. Several times on every walk I found my feet slipping out from under me on the steep descents and on one occasion I fell flat on my back and it has taken months to recover from the damage. So walking poles were the solution. No more falls  a few stumbles but each time saved by my poles.

What are the disadvantages?

Obviously weight, difficulty of stowing inside or outside your pack and more importantly over reliance upon poles, so that agility and balance suffer. No one can say the cost is too great as I have seen them on sale for as low as $19 a pair.

Do you need two poles?

This depends largely on the terrain and whether you need support on both sides at once. The track to Frenchmans Cap in Tasmania is an example of terrain where you need two poles, as the track is very muddy, incised, narrow and often filled with muddy water, making the edges invisible. Two poles allow you to straddle the track , so that a sudden slip to one side can be caught by using the appropriate pole.

In other environments, such as thick scrub, two poles would get in the way and can actually lead to falls as they get caught in the bush.

I found that one pole was more than adequate, for both climbing and descent. Just like the early bushwalkers such as Warren Bonython used when exploring the Flinders, although undoubtedly a lot lighter and more versatile than they used.

WARNING: using only one pole can lead to additional strain on the leg opposite the pole as weight is taken off the leg closest to the pole and you may find yourself with a sore knee. I am reassessing my advice that one pole is adequate, after having experienced knee pain for the first time. Another member of my group, also using one pole, had the same sore knee.

Do poles need to be adjustable in length?

I found that for descending poles need to be longer than for ascending, so the ability to adjust length is important, although there are ways around this problem. Some would argue that adjustable poles are more likely to suffer from failure and are difficult to repair.

Check out my next posting which will compare various styles of walking poles made from a variety of materials.


  Creative Commons License This article by Bush Walker is licensed under a Creative Commons Attribution-NonCommercial-ShareAlike 3.0 Unported License.

Wednesday, June 15, 2011

Bushwalking Equipment | Adjusting The Harness of Your Bushwalking Backpack

Just bought a new backpack and forgot to ask how to adjust it? Heard conflicting methods? Feel that your pack needs some fine tuning to make it more comfortable?
Well there seem to be as many different opinions on how to adjust your pack as there are packs. Of course the three basic designs, internal frame, external frame, and no frame will each be different, but the general principles are the same.

Pack Size

However for adjustments to be comfortable you must start with a backpack that fits your body. Firstly you must select a pack which is the correct length for your torso length. Usually the manufacturer will have a diagram on their website which shows you how to measure this, but usually it is the distance in cm between the C7 cervical vertebra, the largest protrusion at the base of your neck and the iliac crest, the highest point on your hipbone, which can be found by running your fingers down you ribs. Men and women usually have different manufacturer's sizes for the same torso lengths and while related, body height is not the the perfect predictor of torso length.

Choosing the correct pack size 

In some situations, where pack volume is more important, you may be forced to get a larger size, despite it not being a perfect fit.

If you have selected the correct size then it will be possible to adjust the attachment points of the shoulder straps to the pack so they are just below the tops of your shoulders (1-2", 2.5-5cm), while the waist belt will sit over your hip bone, not above it.

To help you adjust the harness of your bushwalking backpack,  I suggest a full length mirror, a partly loaded pack and someone to help you hold the pack in position as you adjust the straps. 

There are usually six straps that need to be adjusted:
  1. hip belt (NB this is not meant to be a waist belt)
  2. hip stabiliser
  3. sternum
  4. shoulder
  5. load lifter 
  6. suspension adjustment
1. Put on your pack and lean forward, tightening your hip belt over your hip bone, so that the middle of the hip belt is covers the iliac crest ( top front of your hip bone) and the buckle covers your belly button. If the hip belt padding from each side touches when the belt is tightened then you have chosen a pack or a belt size (if removable) which is too small as the padding will prevent the hip belt being tightened sufficiently. You need to leave at least 3 cm either side of the buckle after the hip belt has been tightened to allow for different clothing thicknesses.

2. The hip stabiliser or anti-sway straps  prevent your pack swinging from side to side as you walk, by pulling your pack closer to your hip belt.

3. The sternum strap should be half way between your breasts and collar bone and not so tight as to constrict your breathing. Its function is to stop your shoulder straps falling off your shoulders, not to carry the load. When tightened it also prevents your shoulder straps rubbing against your arms and armpits.

4. Shoulder straps should be adjusted evenly so that the pressure on each shoulder is the same and the pack is not tilting to one side. Generally speaking about a third  of your weight should be on your shoulders and these straps proportion the weight between your shoulders and hips. Some people prefer to have 80-90% on the hips, so choose whatever feels comfortable for you at the time and feel free to change the proportion during the day as you develop sore spots. Tighten the shoulder straps and the weight goes from your hips to your shoulders. The shoulder straps should be in contact with your shoulders and you should not be able to place your hand between your shoulders and the strap. The pack attachment point should be just below the crest of your shoulders, and the bottom of the shoulder pad, a hand width below the top of your armpit.
www.alpsmountaineering.com
5. Load lifter straps should be evenly tightened and tight enough so that your pack does not hang away from your body, pulling you backwards, but rests against it. If the suspension is correctly adjusted, and you have purchased a pack that matches your body  length, then the load lifter straps should be angled downwards from your pack to your shoulders at about 45°. They also shift some of the weight from the top of your shoulders to the upper chest area, but if the angle is too steep they will lift the shoulder straps from your shoulder.

6. The harness length can be adjust by lifting the lumbar padding and adjusting the buckle and strap or the velcro.

If the pack is still uncomfortable, then the internal frame stays may need to be removed and bent to more closely match your spinal curvature or perhaps curved away from your shoulder area to move the pack away from your head if it keeps bumping on it.

Comfort also depends on how you load your pack, with heavier items towards the middle near your shoulder blades to keep the centre of gravity close to your body. The lighter items such as clothing and sleeping bag can go at the bottom. Over riding this principle, you should keep the items you will need first in setting up camp near the top, especially if it is raining.

When crossing a river it is a good idea to undo the waist belt and sternum strap in case you need to jettison the pack, otherwise you can easily float down stream with it.

www.lookingforadventure.com
Similar Posts

Packing for a Bushwalk
How do You Organise Your Food for a Multi-day Hike? 
Bushwalking Boots |Selection and Fitting Criteria 
Bushwalking Workflow | Repacking the Next Morning 

  Creative Commons License This article by Bush Walker is licensed under a Creative Commons Attribution-NonCommercial-ShareAlike 3.0 Unported License.

Saturday, April 30, 2011

Saving Time with a Bushwalking "Thermos"

Ever wished you didn't have to light your stove in the morning just to make a hot drink? Ever had hot water left over after your evening meal that you have wasted? Does you cup serve more than one function? When its raining, have you ever wished you didn't have to go outside your tent to light your stove?  Ever wanted to sleep in for another fifteen minutes but didn't have the time? Like to pack your tent in a leisurely fashion without worrying about your tea/coffee getting cold? Save time with an insulated vacuum  flask and add very little extra weight.
Zojirushi Tuff Slim Stainless Steel Vacuum Bottle
The solution to all these problems is a "lightweight" stainless steel vacuum insulated flask which can be pre-heated and filled with hot water the previous night and will still be warm the next morning. With a wide-mouthed flask you can soak your dehydrated food in hot water during the day and have it ready for dinner or have hot porridge for breakfast. No longer do you need to get up fifteen minutes earlier to light your stove just to boil one or two cups of water, and then wait for it to cool down before you can pack it away.

Intuitively a "thermos" would seem like an additional, unnecessary piece of equipment to take on a bushwalk,  but is it really? It can replace your mug (135 g) and maybe one of your smaller water bottles (100g), so it is not all added weight.  Some fuel can be saved each morning, which would otherwise have been wasted heating the stove and billy and your valuable "sleep-in" time increased. If you are using a wood campfire then the time saving is even greater. Get cold feet at night, then here is you solution?

Heat Retention

Use a spare sock or stubby holder to increase insulation and reduce heat loss. On a cold night use it as a foot warmer in your sleeping bag. With these tricks and pre-heating, I have managed to maintain coffee at the standard McDonald's temperature of 60°C for over 12 hours. This is a little cooler than usual coffee connoisseur's range 155ºF/70ºC - 175ºF/80ºC but its OK for the bush. Unfortunately, smaller flasks cool more quickly than large, so most bushwalkers are starting with a size handicap. The easy pour lids that allow you to pour by pressing a button or lifting a tab seem to lose heat faster so try to avoid these and instead select one with a screw top. Take the claims on the flask boxes and their websites with a "grain of salt" as many have been proven to be grossly inaccurate. If you have the opportunity to compare flasks and don't have a thermometer, touch the outside; the one that is hotter will cool the fastest.

Well regarded brands include:
  • Sigg Thermo Trend (.3L, .7L, 1.0L) which will supposed keep water hot for 14 hours
  • Thermos Thermax Light and Compact (0.47L/325g, 0.75ml/475g, 12hrs) They also have Thermos TherMax Ultimate Flask 0.5L Graphite at 310g which is supposed to keep hot for 24 hours.
  • Aladdin (apparently has won some comparison tests, but many have had trouble with under performance with the 1L Stanley model)
  • Zojirushi Tuff-Slim (0.5L/450g) 167°F/75°C @ 6 hrs. / 117°F/50°C @ 24 hrs. Rating is based on water at a starting temperature of 203°F (95°C) at a room temperature of 68°F (20°C). Zojirushi have been specialist vacuum flask manufacturers for ninety years.

    They also make the 12 oz (0.35L) Zojirushi Stainless Steel Mug (SM-CTE35) with built in Tea Strainer. A great idea for Chai tea or if you don't like tea bags.
Amazon.com Product Description
This Zojirushi Stainless Mug comes with a tea strainer that allows you to brew fresh tea right before drinking. It features vacuum insulation to keep beverages hot or cold for hours, nonstick interior for easy cleaning, 2-inch wide mouth (easily accommodating ice cubes), detachable and easy-to-clean tea strainer with handle, and a secret compartment on lid for tealeaves and teabags. The screw-tight lid provides better heat retention compared to commuter mugs, and prevents leaks. The body can be washed under running water, but the bottle should not be soaked in water. It's backed by a 5-year warranty for heat retention. 
      Wide-mouthed flasks
      You might like to consider getting a wide-mouthed flask which is more versatile, easier to eat from and clean, but is less well insulated and slightly heavier. Good examples come from Zojirushi eg the Tuff-Mug SM-AFE35 (12oz/0.35L/450g wide-mouthed (5cm) thermo,  which can keep water at 181F (81°C) for 1 hour or 140F (60°C) for 6 hours). Rating is based on water at a starting temperature of 203°F (95°C) at a room temperature of 68°F (20°C) The Tuff-Mug has room for storage of a teabag and a non-stick interior for easier cleaning. Some mention that wide-mouthed flasks are more difficult to drink from and that you may need a cup too, but in the bush this is a luxury most will do without.

      Zojirushi Stainless Steel Tuff Travel Mug

        Creative Commons License   This article by Bush Walker is licensed under a Creative Commons Attribution-NonCommercial-ShareAlike 3.0 Unported License.

      Friday, April 29, 2011

      My Ideal Bushwalking Hat

      Which features does the ideal bushwalking hat need for Australia? Do you need more than one hat? What are the types of hats available?
      My ideal hat would have the following features
      • lightweight
      • breathable and cool
      • easily folded to fit the lid of my pack without damage
      • easily cleaned
      • provides protection all round from the sun
      • large brim at the front to ward off branches and keep rain off my face
      • can be worn under a rain jacket hood
      • not damaged by rain
      • chin cord to stop it blowing away
      • allows me to tilt my head back without hitting my pack lid
      • warm and covers the ears
      Does such a hat exist?

      Well I've yet to find ONE single hat that will do all of these things. I think that for Australia we need at least TWO hats, one for cold, wet winters and one for hot, sunny summers.

      What are the options?

      The most popular are:

      Baseball Hats: these can be bought with a long rigid peak which is waterproof and fit under a rain jacket hood. Their limitations are lack of warmth and usually little sun protection to the sides and rear. Neck protection can often be added with a velcroed flap. They can be bought made of oilskin which makes them waterproof for winter but usually too hot for summer. Breathability can be increased by using mesh side panels. Most give away versions lack durability, especially the peak which is often cardboard, but have the advantage they can be cheaply replaced.
      http://en.wikipedia.org/wiki/Bucket_hat
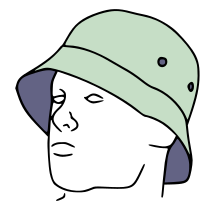
      Cricket, Army "giggle" or "bucket" Hats: these are made of cotton, cool, provide shade all round, can be easily stowed and washed and allow you to tilt you head back to some extent when wearing a pack with a high top lid. They can be bought in waterproof camouflaged fabric from Army disposal stores. They are not warm and don't have a rigid peak to the front to protect your face.

      Beanies: these are warm, usually cover the ears, lightweight and can be worn under a rain jacket hood or even to bed. While wool has served this purpose well in the past, many bushwalkers are using synthetic fleece which is lighter and often warmer. A bean with a draw cord keeps it from slipping down over your eyes.
      http://www.sunprotection.com.au/pages/headwear.html
      Adapta-a-Cap Flippa (Goso): a combination of a baseball cap and an arabian head cover, made of soft fabric that can hang down to cover the ears and neck or be tucked up using elastic loop to form a baseball style cap. Great all round sun protection with a firm peak, but certainly not waterproof. I have one of these for very hot weather, but it can be a little hot when worn as shown.

      http://www.asmeclipse.com.au/generalproducts.htm
      Solar Eclipse: my favourite for summer is the microfibre hat at the bottom right, which combines the best features of several styles of hat. It is soft and cool, with a very wide rigid brim at the front which protects the eyes, face, and ears; a ventilated cricket style hat on top,  and a hang-down neck cover at the back which allows you to tilt your head back when wearing a high pack. With a draw cord at the back it can be adjusted to fir all sizes and has in addition a neck cord to stop it blowing away. Not waterproof but could be worn under a hood.

        Creative Commons License This article by Bush Walker is licensed under a Creative Commons Attribution-NonCommercial-ShareAlike 3.0 Unported License.

      Thursday, April 28, 2011

      Campfire or Stove?

      Should you ever burn firewood? Is it OK to use firewood for a cooking fire? How do you maximize the weight savings by using a wood fire? How should you establish your fire to minimize the amount of firewood needed? When can I use a campfire? What should I do to minimize the risk of a bushfire?
      The last time I used a campfire for cooking was about 20 years ago. Since then I have used a succession of stoves such a Bluet gas, Trangia, and MSR Whisperlite, so it was not without some deep thought that I used a wood fire again, this time in the Vulkathunha-Gammons NP.

      Why make the change back to a bygone era?

      Well the main reason was the weight saving (0.8 -1.0 kg) by not needing a stove and fuel bottle, the remoteness of the campsites and the ready availability of firewood which made it forgivable in my mind. The Gammons is an arid region and as such tree growth is very slow, but creek beds abound with firewood deposited in the last flood and while some may argue that this debris is the home of many animals, I doubt that our group's impact was significant. That is not to say that in some more accessible locations, such as Mambray Creek in the lower Flinders Ranges our actions would be an environmental crime.

      Is it ever OK to burn firewood?

      Well what are the alternatives? Shellite (white gas), methylated spirits, butane/propane gas. Are these fuels any better than using firewood? Are they fossil fuels? Do they pollute the atmosphere? How much CO2 was released in the mining process to produce the metal needed to make the stove and fuel bottle? What about the energy requirement of extracting, refining and transporting the fuel? Do they use scarce food resources to make fuel? Isn't wood renewable? Are we depriving animals of their homes when we burn firewood? The decision is not clear cut and ultimately must depend on your personal perspective. Certainly there is a level of camaraderie around a campfire that can never be achieved sitting around a Trangia.

      Minimising the use of wood.

      If you are going to have a campfire keep its fuel consumption to a minimum, burning only enough wood for essential cooking and to provide optimal light and heat. Judge how much wood you will need until bedtime and don't build up the fire late in the evening, so that there are flames after you have gone to bed. Try to suspend cooking utensils above the flames to minimise cooking times and don't heat more water than you will need. Use rocks to shield the fire from the wind and start the fire in a pit so the coals can safely be buried before retiring.

      Reducing the risk of starting a bushfire

      Use a moderate size fire so sparks don't blow on to tents or into the bush. Put out your fire with water before retiring and then bury the extinguished coals. Leave your fire pit so that it is not obvious there has been a recent campfire. Don't have a breakfast fire, instead storing a hot drink in your Thermos overnight, to reduce the need for fuel and save time. Only light a fire outside the bushfire season and as advised by NPWS.

      Creative Commons License This article by Bush Walker is licensed under a Creative Commons Attribution-NonCommercial-ShareAlike 3.0 Unported License.

      Bushwalking Gloves for Scrambling?

      Ever come home from a bushwalk with broken finger nails, splinters from and cuts to your hands caused by vegetation? What is the solution?
      My walk in the Vulkathunha-Gammons National Park last weekend was the third time I have taken a pair of lightweight cotton gloves with me when bushwalking in Australia.

      Many of our bushwalking tracks in Australia require fighting through thick prickly undergrowth, scambling up loose scree, or clinging to steep slopes where every bit of support can be lifesaving. We all know that 3 point contact with the ground, using both hands and feet, is well advised in steep terrain.

      http://www.sentrysafetysupply.com
      Gloves are invaluable in preventing injury and more importantly allowing you to make better use of your environment to improve your safety. While gloves could be a disadvantage in rock climbing, when scrambling they are a definite advantage.

      What sort of gloves should I get?

      Gloves for use when scrambling in Australia should be cool, lightweight and cheap. Cotton thread or string is the ideal material although leather reinforcement at wear points can be useful. Want to go high tech, then try Dyneema reinforced gloves which are cut resistant and very lightweight? Need something more grippy, then  buy a pair with PVC dots? If you need something warmer, then try a pair of polypropylene inserts

      Where do you get such gloves?

      Well you could use the types of gloves used by cyclists or skiers, but they are unnecessarily expensive. Why not try your supermarket or hardware shop in the garden section? Here cotton gloves cost only a few dollars.

      Acknowledgement


      Thanks to Lester for convincing me of the necessity of gloves when bushwalking in the harsh Australian environment.

        Creative Commons License This article by Bush Walker is licensed under a Creative Commons Attribution-NonCommercial-ShareAlike 3.0 Unported License.